Rights import
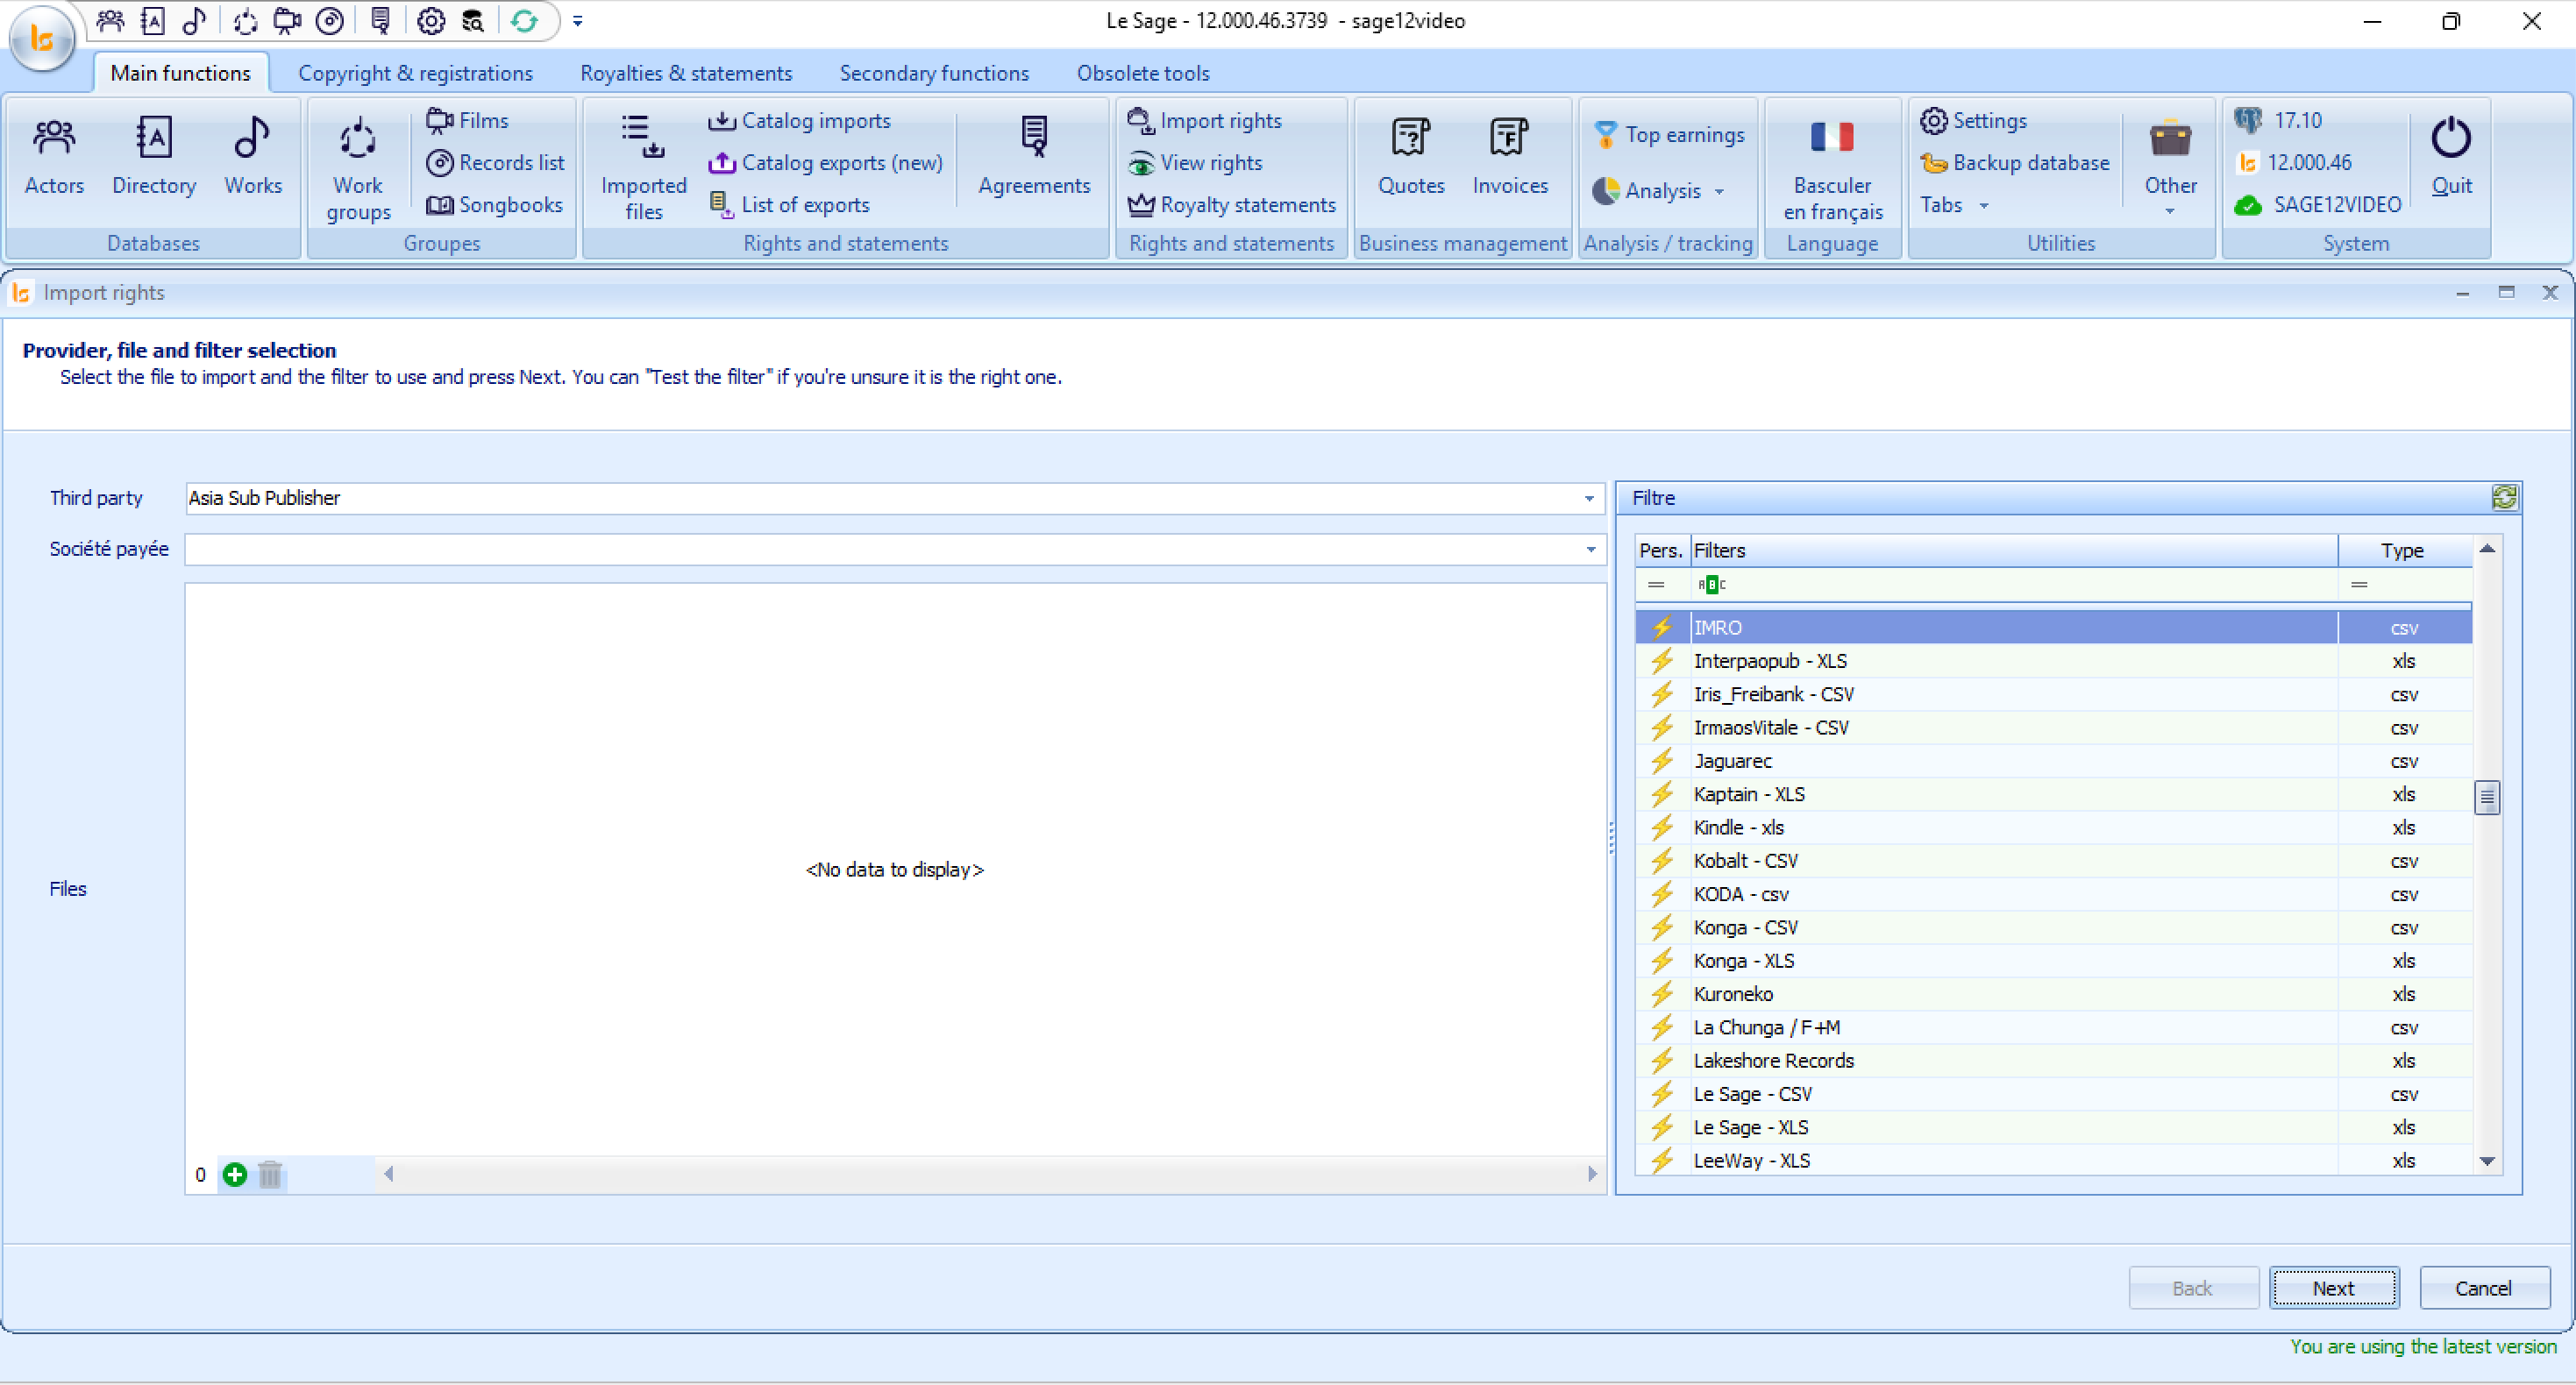
"Import rights" Menu
The Import rights module allows you to import royalty statements and sales reports (such as CSV or Excel files) into Le Sage to calculate and distribute royalties.
Step-by-Step Instructions
1. Select the Provider & Payee
-
Third party: Click the dropdown menu and select the entity or partner that sent you the rights/royalty report (e.g., Asia Sub Publisher). If it is a new provider you ust go to Settings - Third Party and add a new one.
-
Paid Company: Select the internal entity or sub-label in your system that has received the money.
2. Select the Data File(s)
-
At the bottom-left of the main central panel, click the green Plus (
+) icon. -
Browse your computer to locate and upload the raw statement/report file(s) provided by the third party.
3. Select the Matching Filter
-
In the Filter panel on the right side:
-
Browse or search for the matching parser filter corresponding to the report format you are importing (e.g., matching the third-party name, such as IMRO, Kobalt, KODA, etc.).
-
Pay close attention to the file format column (Type:
csv,xls, etc.) to ensure it matches your source file format.
-
This filter will be automatically selected if you add in the settings of the Third Party - in Settings - the filter.
4. Proceed
-
Click Next at the bottom-right corner to process the file mapping and proceed to the next stage of the import process.
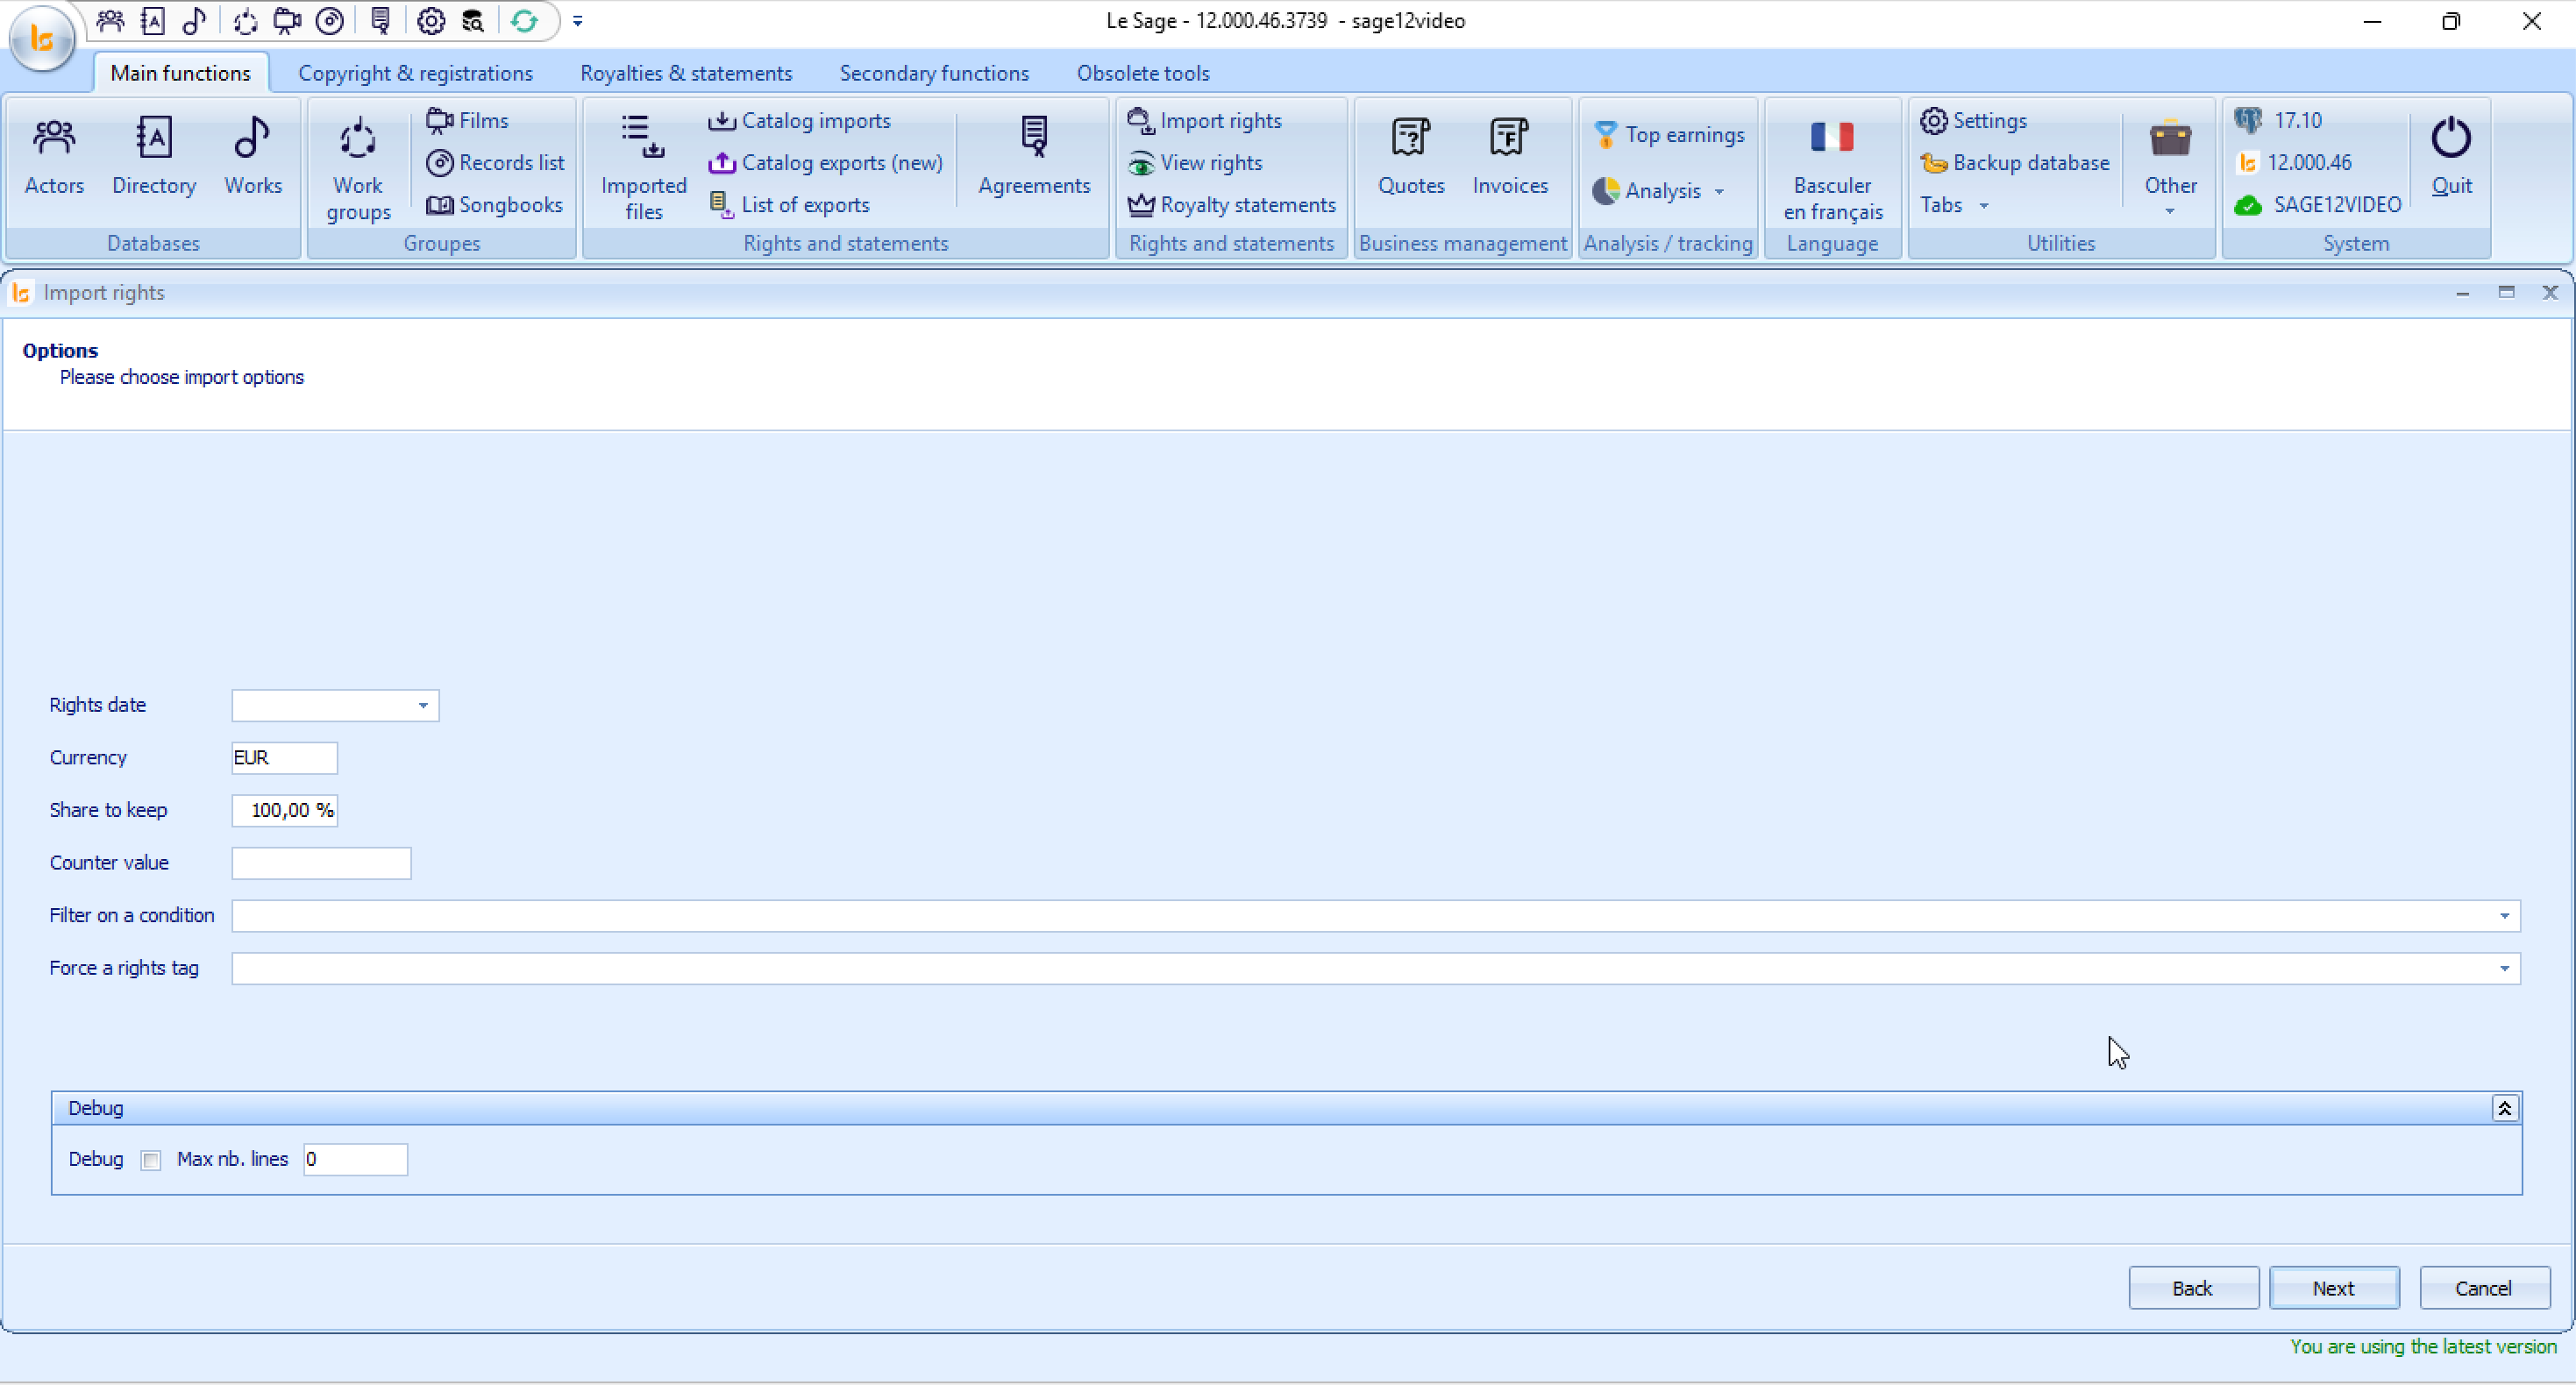
Step 2: Options
This screen allows you to configure specific parameters, exchange rates, and filters before processing the rights data.
Step-by-Step Instructions
1. Configure the Rights & Financial Settings
-
Rights date: Select or enter the effective period/date for the statement you are importing (e.g., the statement period or accounting date).
-
Currency: Specify the original currency of the incoming file (e.g.,
EUR,USD,GBP). By default it will be the one entered in Settings.
If the file has a currency information, the filter should add the information directly in the rights
2. Apply Optional Import Filters & Tags
-
Filter on a condition: Select a predefined condition from the dropdown to filter out specific lines from the file during import (e.g., importing only specific territory codes or work types).
-
Force a rights tag: Apply a global tag to all imported lines in this batch for paying out particularly, easier tracking, reporting, or grouping later.
3. Debug Section (Optional / Advanced) - For improvize team exclusively
-
Expand the Debug panel at the bottom only if you are testing a new import filter or troubleshooting file errors.
-
Check the Debug box and specify a Max nb. lines value (e.g.,
100) to process only a sample of the file instead of the entire dataset.
4. Proceed
-
Click Next in the bottom-right corner to run the file parsing and move to the final validation step.
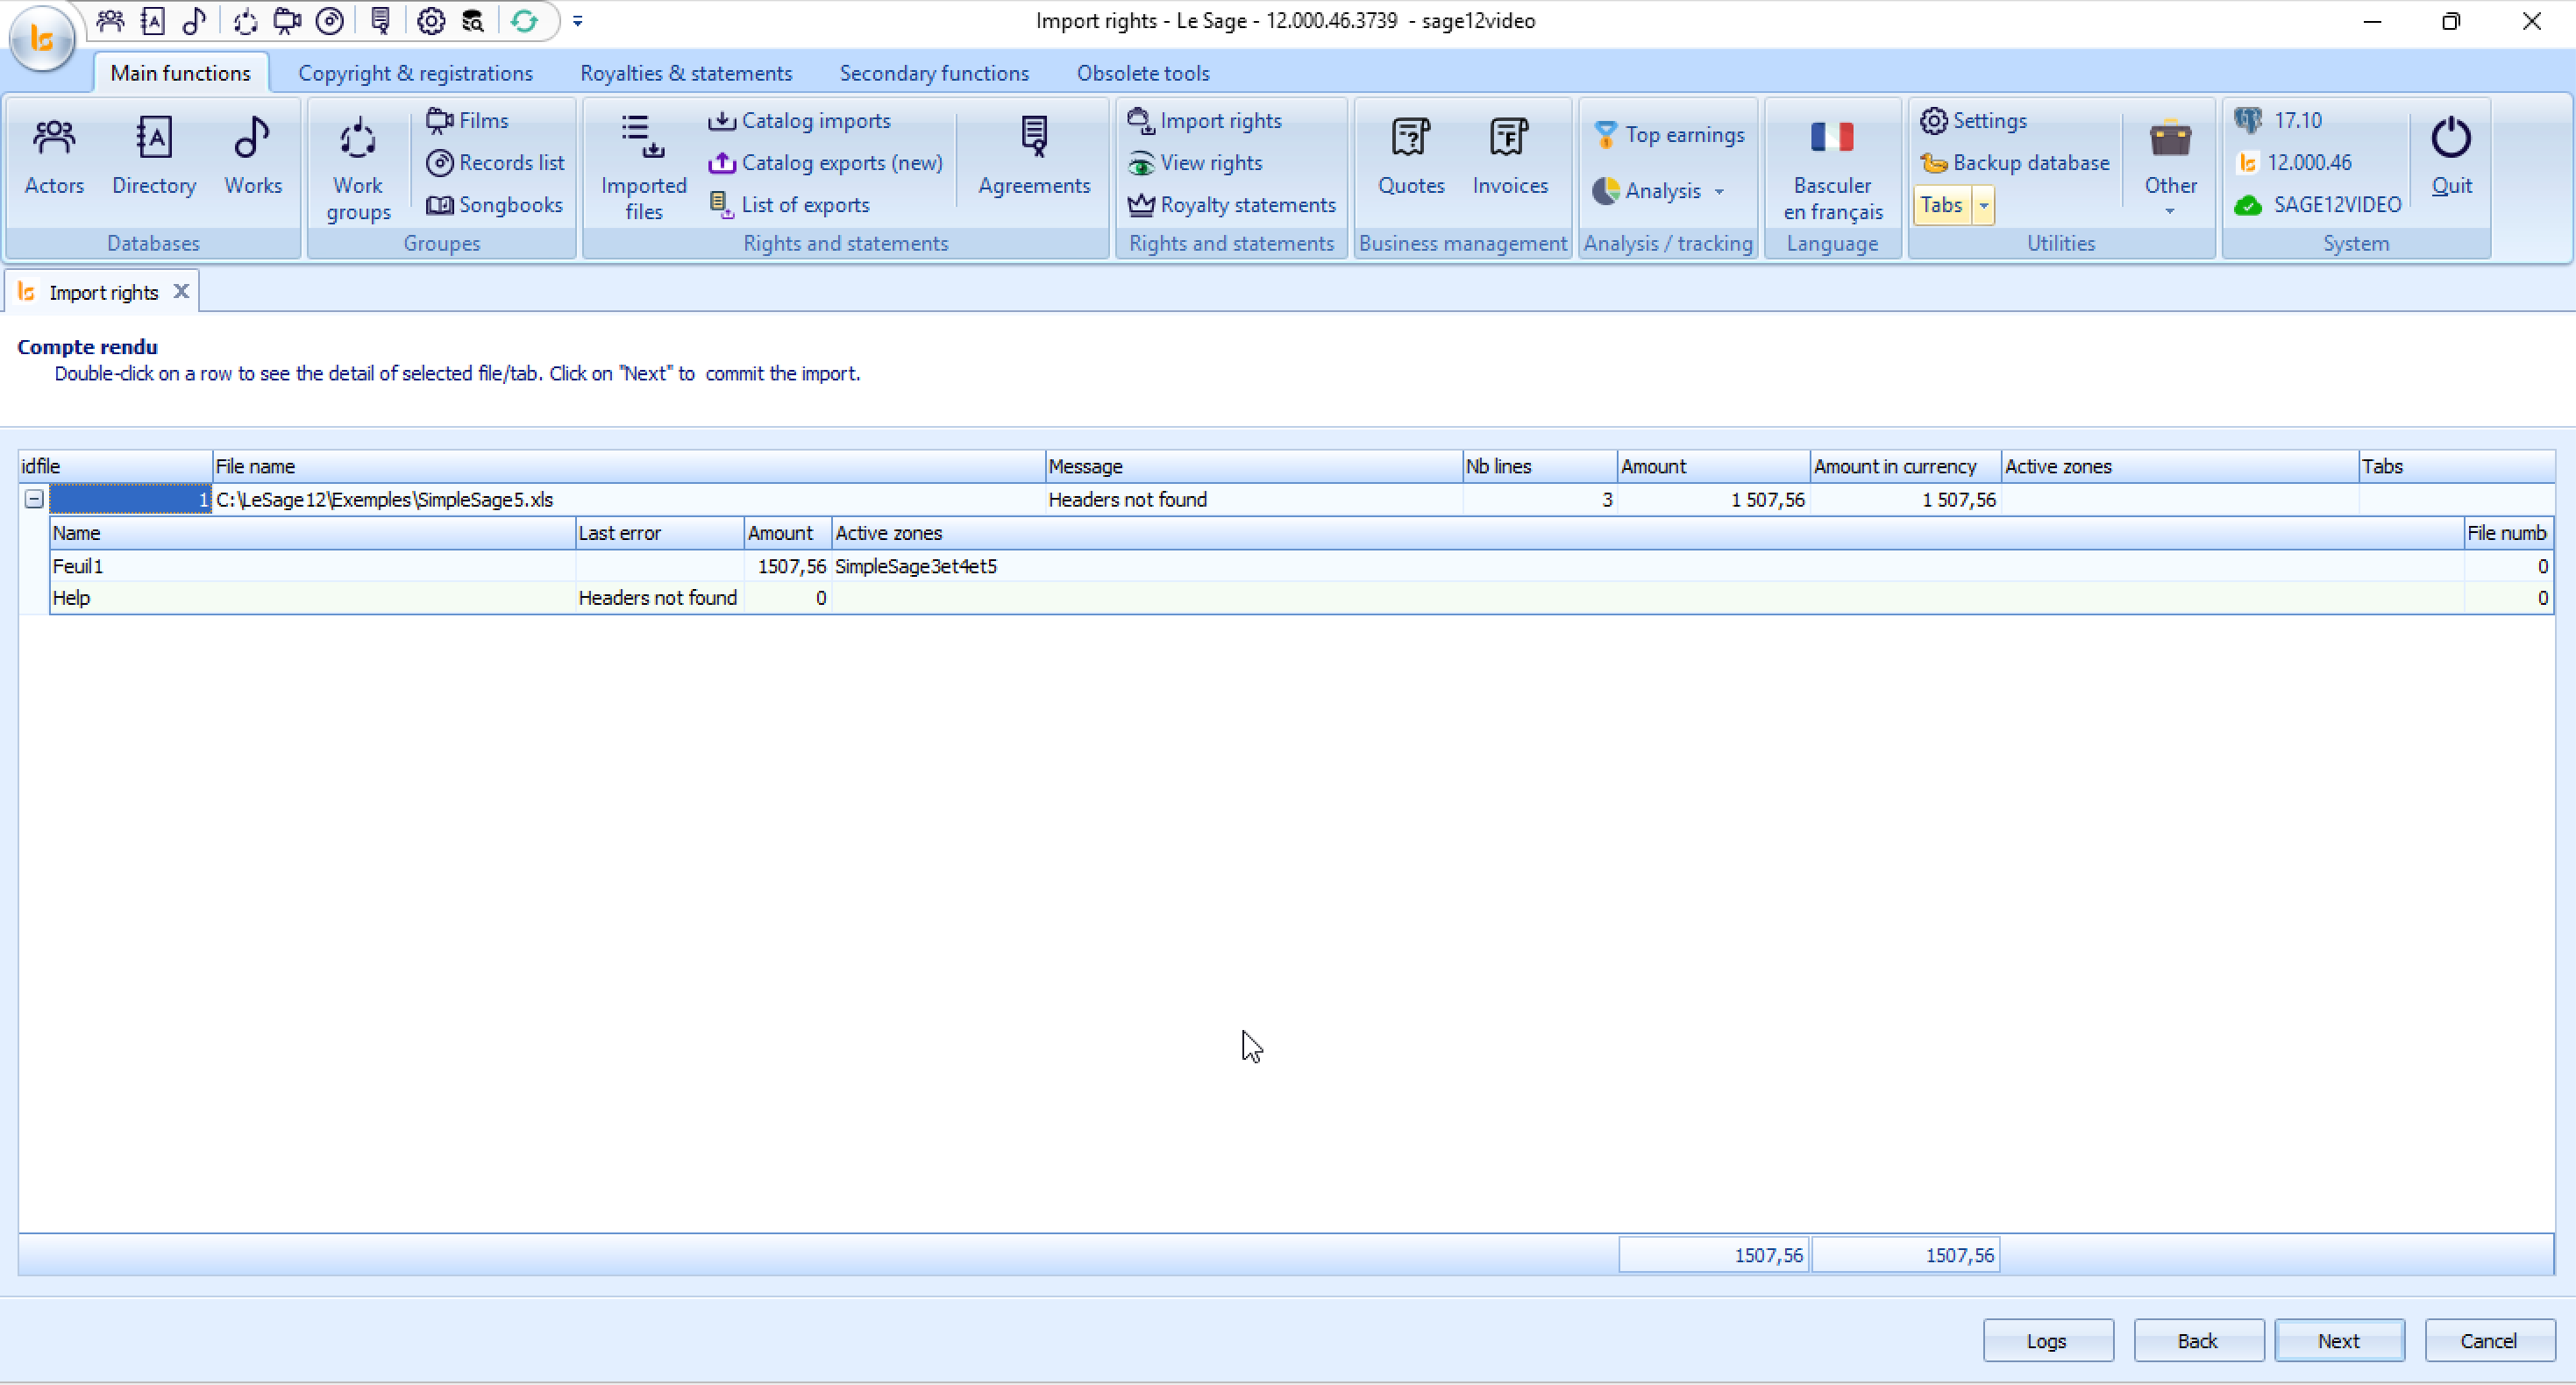
Step 3: Import Summary
This screen displays the pre-import results, summary metrics, and any warnings or errors detected in your input file before final database insertion.
Understanding the Summary View
-
Overview Table:
-
File name: Path to the imported file (e.g.,
C:\LeSage12\Exemples\SimpleSage5.xls). -
Message / Last error: Highlights issues found during parsing (e.g.,
"Headers not found"). -
Nb lines: Total number of parsed data rows (e.g.,
3). -
Amount / Amount in currency: Calculates the sum total of royalties parsed from the file (
1 507,56).
-
-
Detailed Sheet Breakdown:
-
Expanding the row reveals individual sheets (e.g.,
Feuil1,Help). -
In your example, sheet
Feuil1processed successfully with an amount of1 507,56, while the sheet namedHelpproduced the error "Headers not found" because it contains instructions rather than structured rights data.
-
Step-by-Step Instructions
1. Inspect File Details or Errors
-
Double-click on a row to open a detailed breakdown of the selected file or worksheet.
-
Click the Logs button at the bottom-right to open a full system log file for granular error tracking. - exclusively for Improvize Team.
2. Address Warnings (e.g., "Headers not found")
-
If the error is on a secondary sheet (like
Help): You can often click Next to proceed, as the main data sheet (Feuil1) was parsed correctly. -
If the error affects your main data: Click Back, fix the Excel column headers to match the expected filter format, or choose a different filter.
3 . Finalize the Import
-
Verify that the total Amount (
1 507,56) matches the expected balance from your partner's statement. -
Click Next to commit the imported rights into the Le Sage database.
Or you could want to see more details before completing the import.
Double click on the line
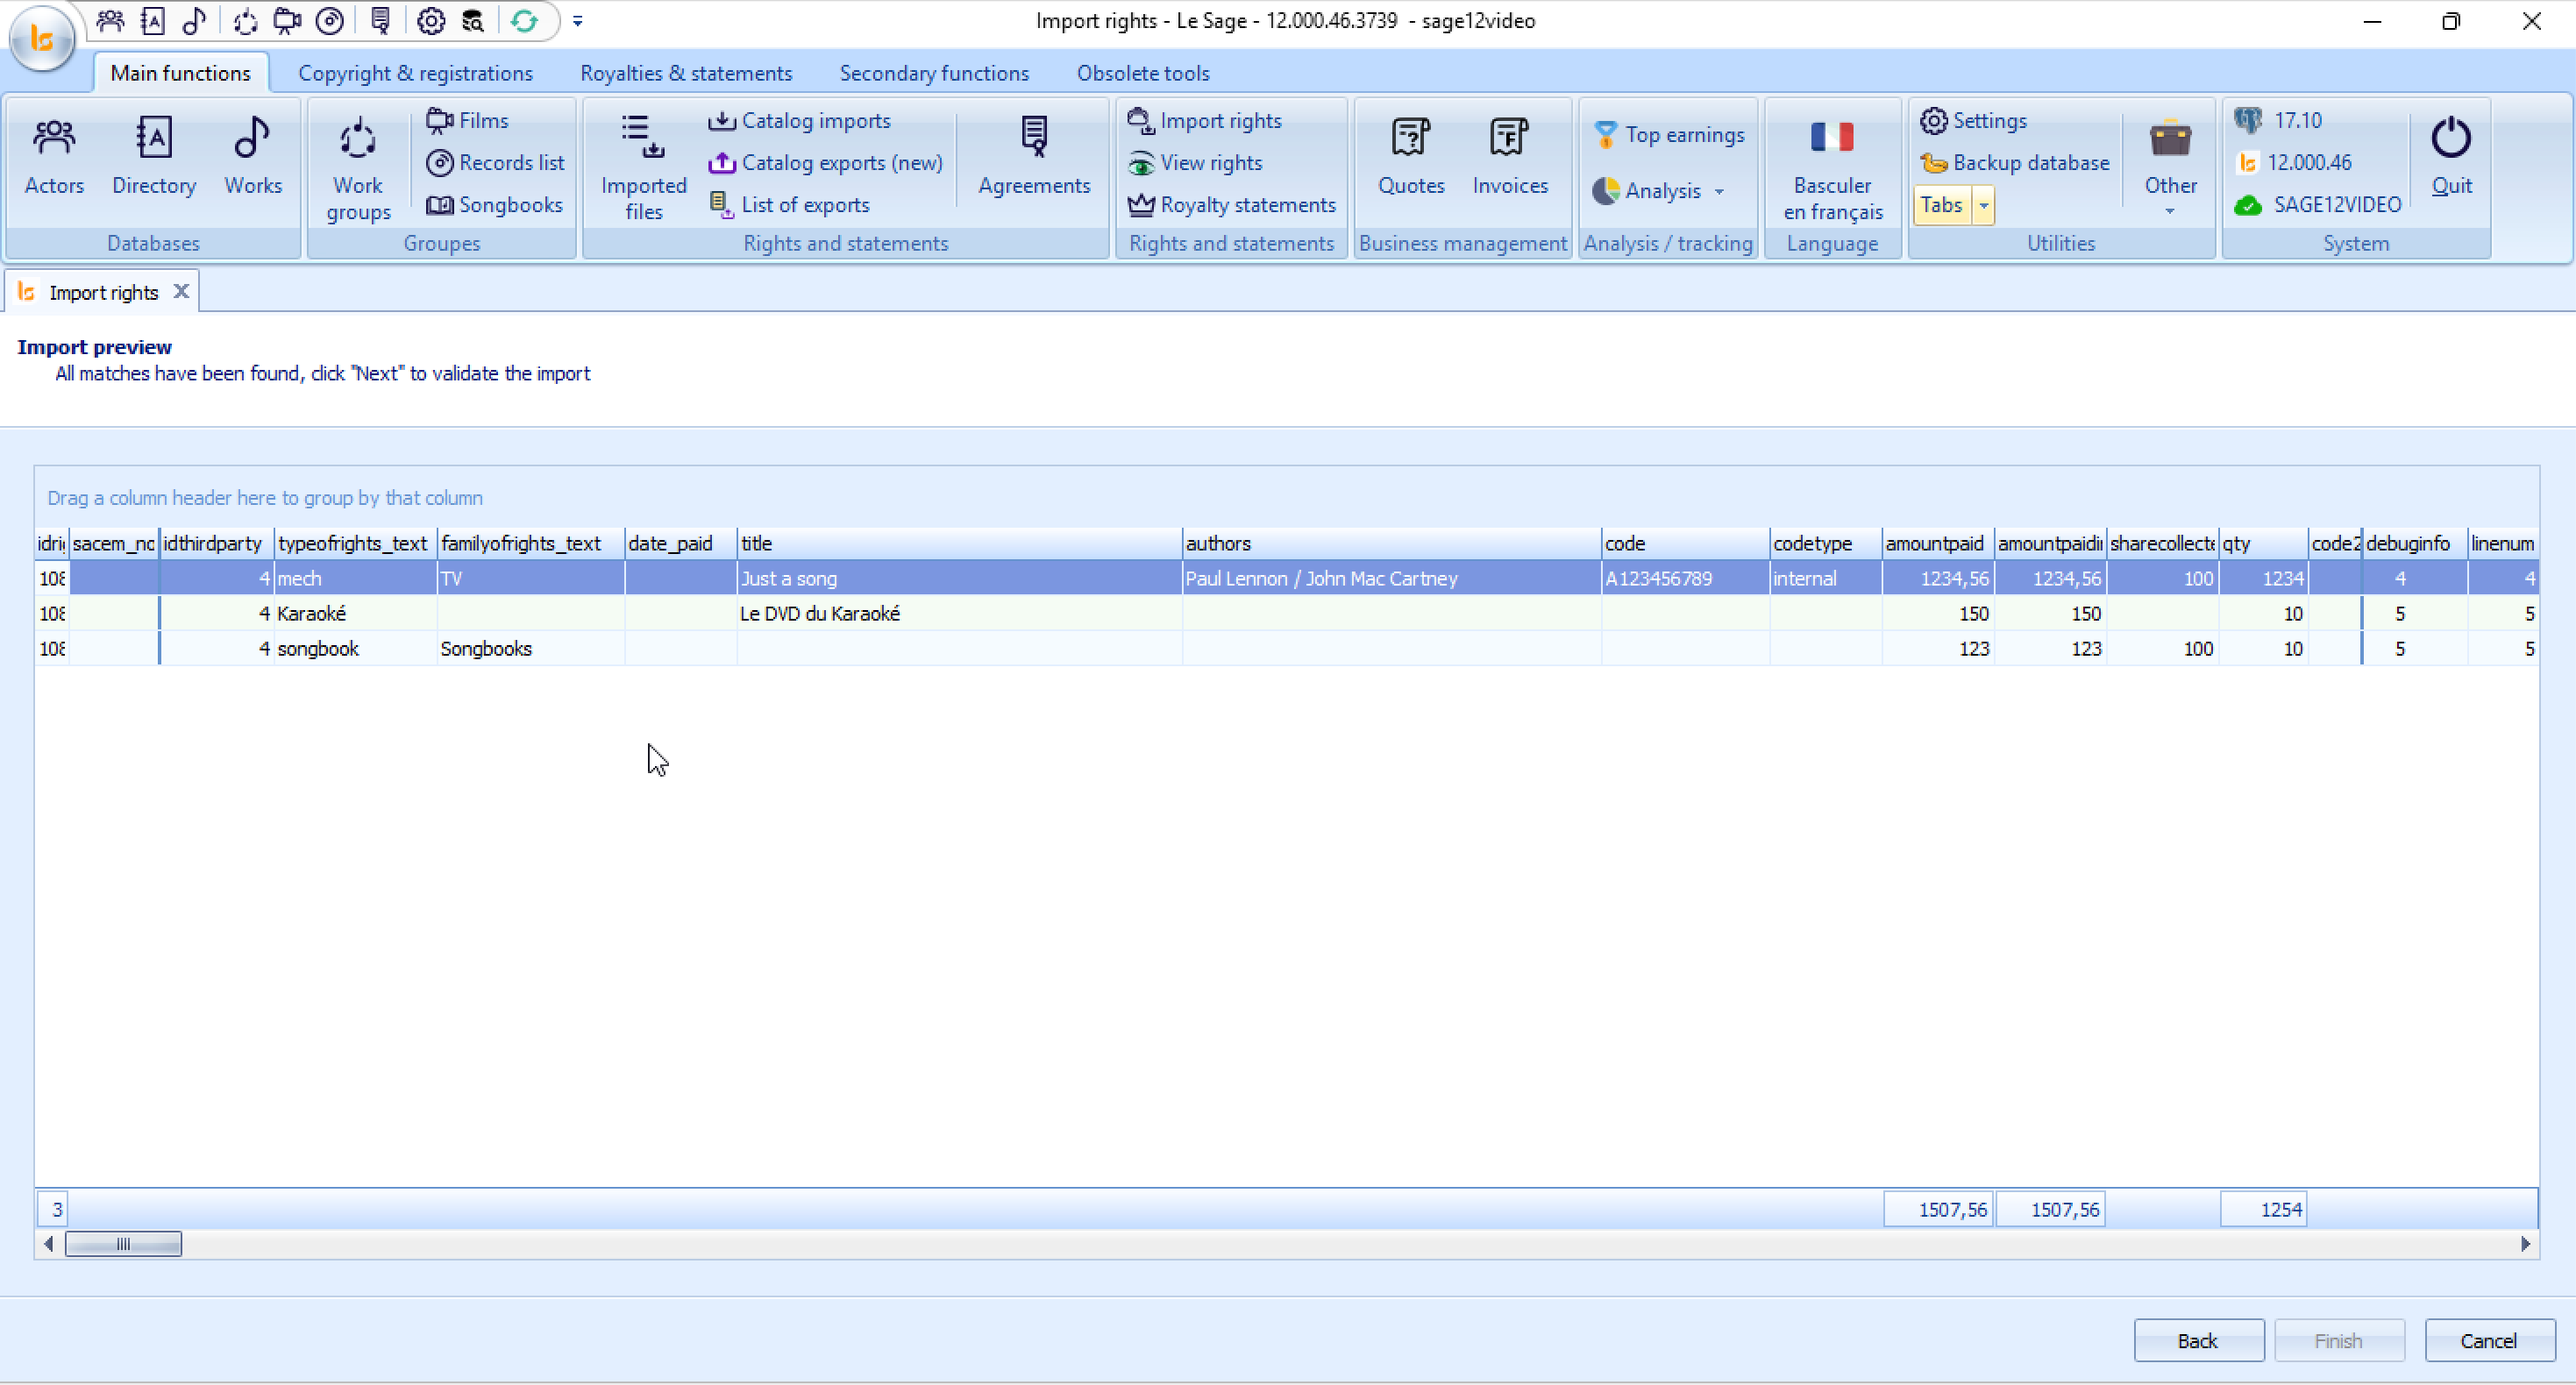
This screen provides a granular, line-by-line preview of all parsed royalty records before they are officially saved to the database.
Understanding the Preview Data Grid
The table displays every individual line item processed from your source file. Key columns include:
-
typeofrights_text / familyofrights_text: The categorization of rights (e.g., mech, Karaoké, songbook, TV, Songbooks).
-
title & authors: The work information mapped from the file (e.g., Just a song by Paul Lennon / John Mac Cartney, Le DVD du Karaoké).
-
code & codetype: The identifier mapped for catalog matching (e.g., A123456789, internal).
-
amountpaid / amountpaidin: Financial amounts mapped to each line item.
-
qty: Quantities or units reported for each line item.
- etc.
Step-by-Step Instructions
1. Review & Audit Lines
-
Scroll horizontally to verify that all column data aligns with the correct fields.
-
Check the bottom totals row to confirm that the aggregate amounts (
1 507,56) and unit totals (1254) match your expectations.
2. Grouping & Sorting Data (Optional)
-
You can drag a column header into the light blue banner above the table (labeled "Drag a column header here to group by that column") to temporarily group records by categories such as
typeofrights_textorfamilyofrights_textfor easier auditing.
3. Complete the Import
-
Look for the notification message at the top left: "All matches have been found, click 'Next' to validate the import" (or the Finish button at the bottom right).
-
Click Finish (or Next) to execute the final commit. Once clicked, the records will be permanently inserted into the Le Sage database under your selected third party.
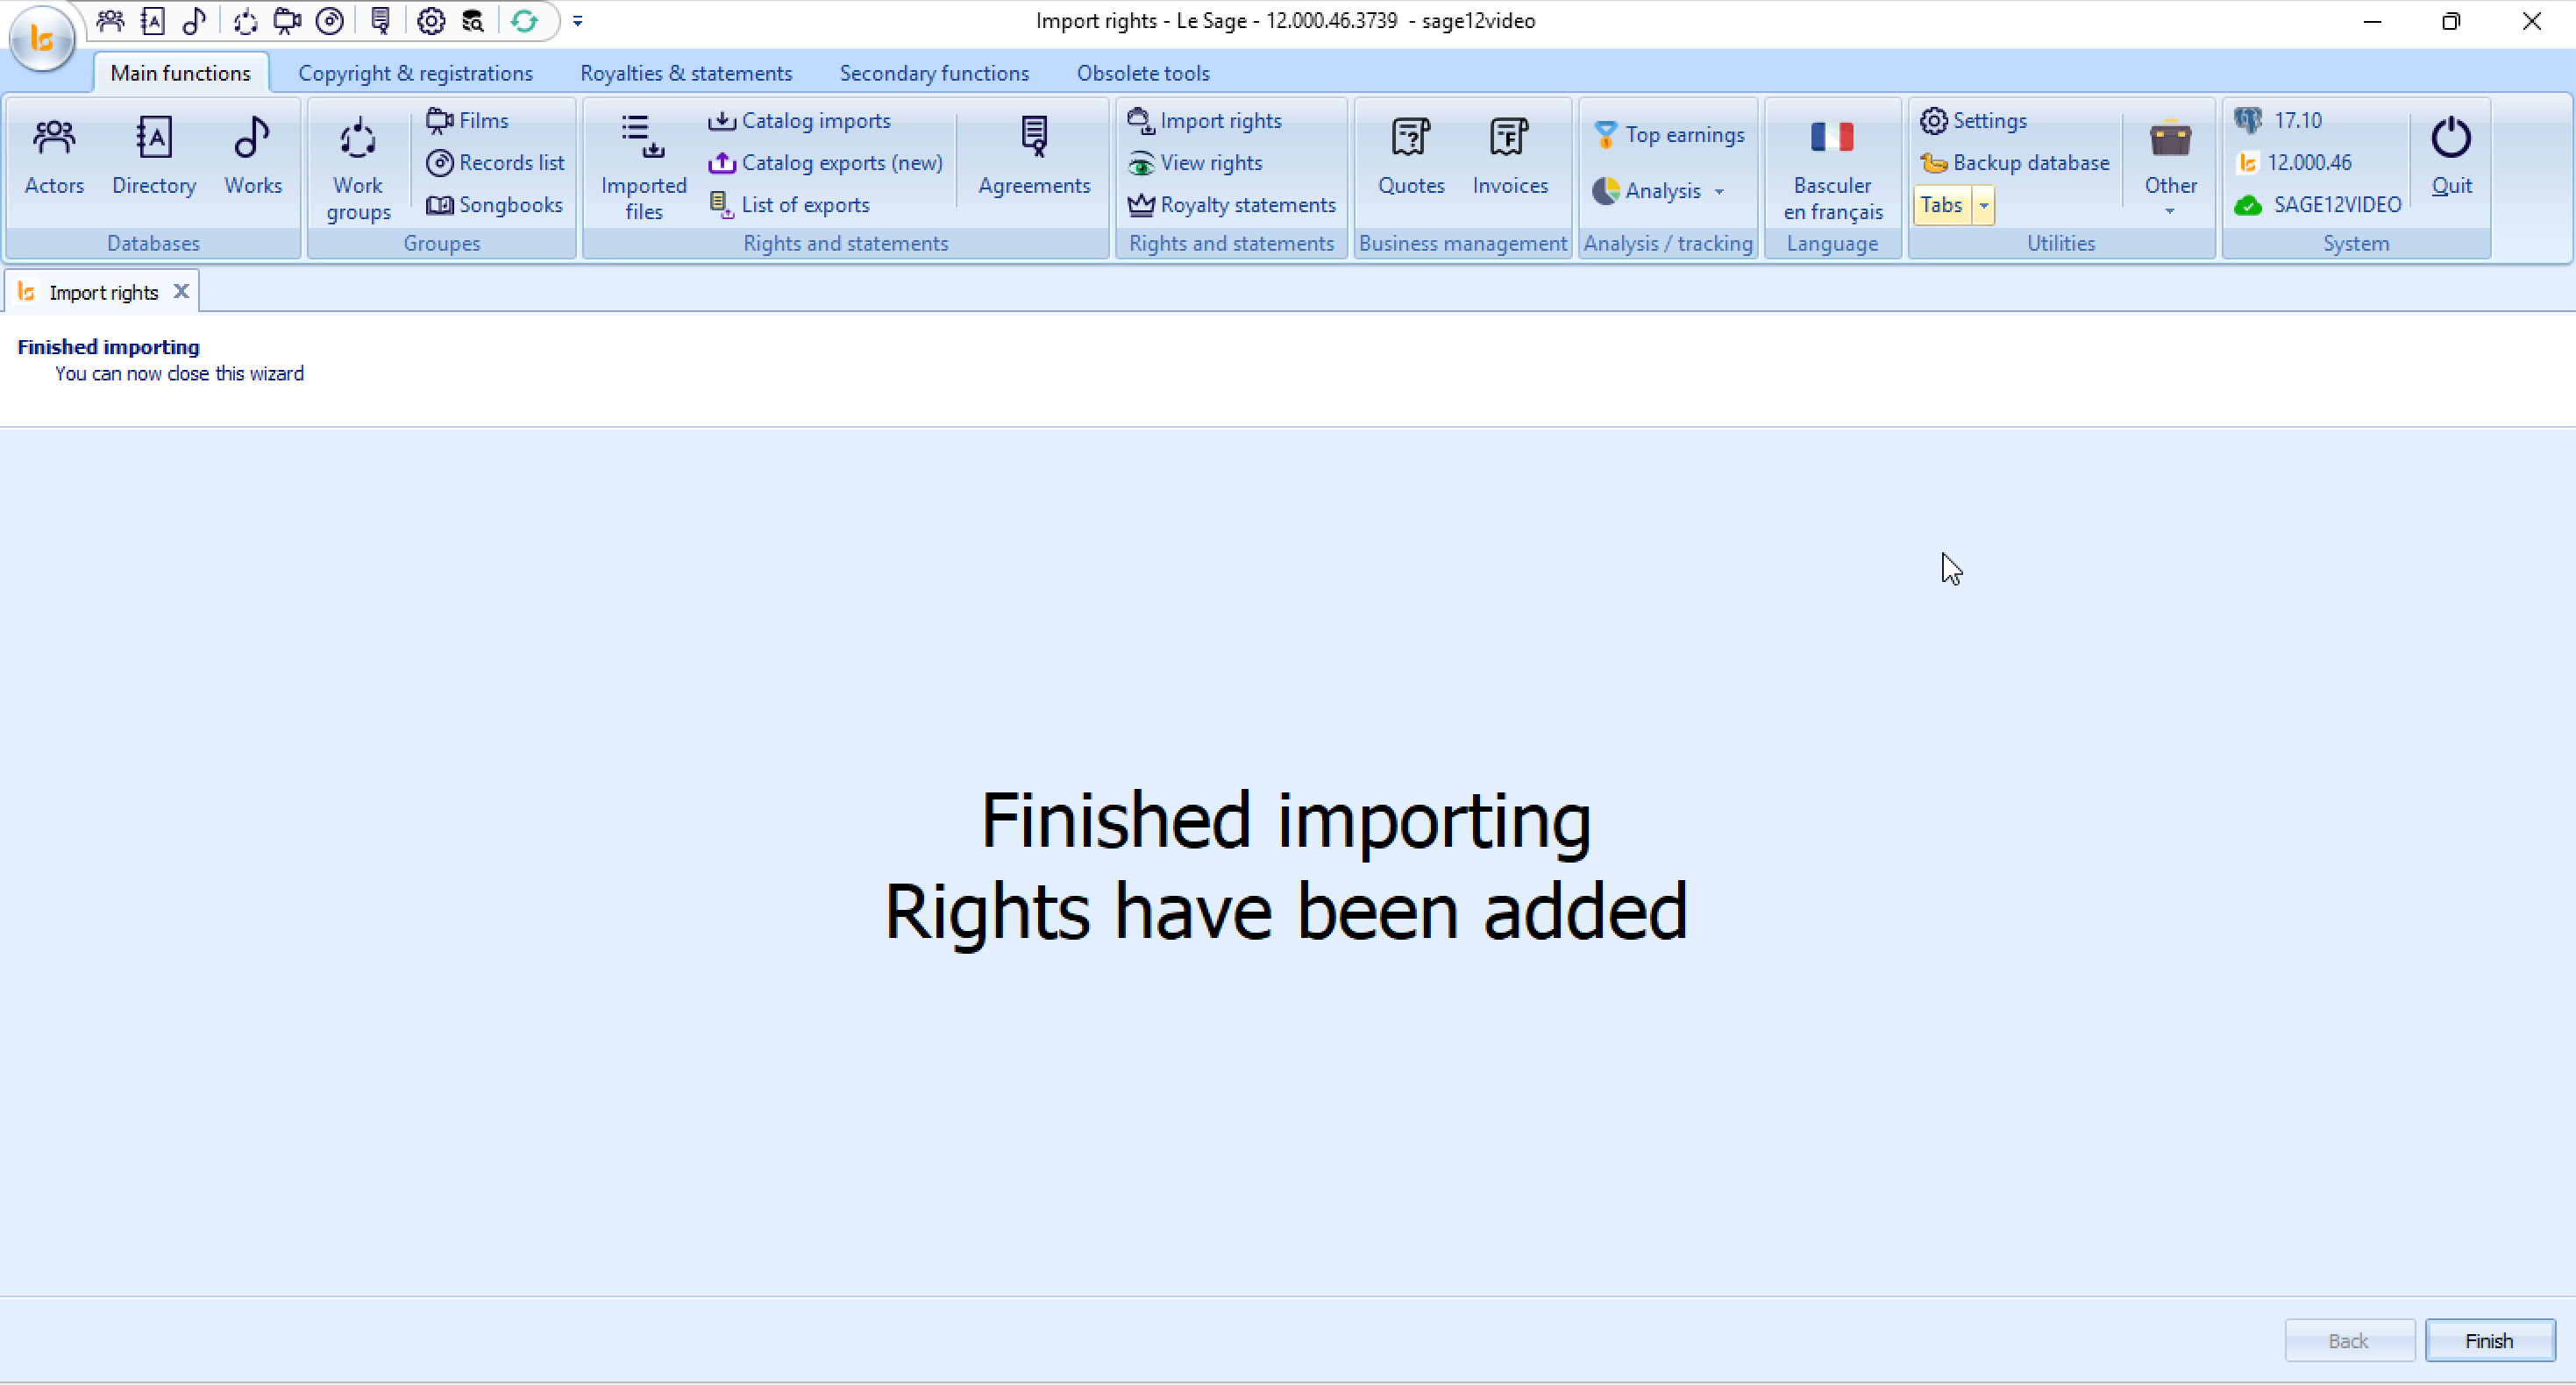
Step 5: Confirmation & Completion
This final screen confirms that the data processing is complete and that all parsed records have been successfully added to your database.
Step-by-Step Instructions
1. Confirm Success Message
-
The screen displays the confirmation message: "Finished importing / Rights have been added".
-
This indicates that all line items from the preview screen have been successfully written to the system database under the specified Third Party.
2. Close
-
Click the Finish button in the bottom-right corner (or close the Import rights X tab at the top left) to exit the wizard.
Recommended Next Steps
Once closed, you can:
-
Verify Imported Records: Go to View rights under the Rights and statements tab in the main ribbon to inspect the newly imported entries.
-
Start the matching process going to Imports List.