Importing rights
The Import rights module allows you to ingest royalty statements, sales reports, and digital performance distribution files. This data is linked directly to a specific third party or collection society to process income data across your catalog.
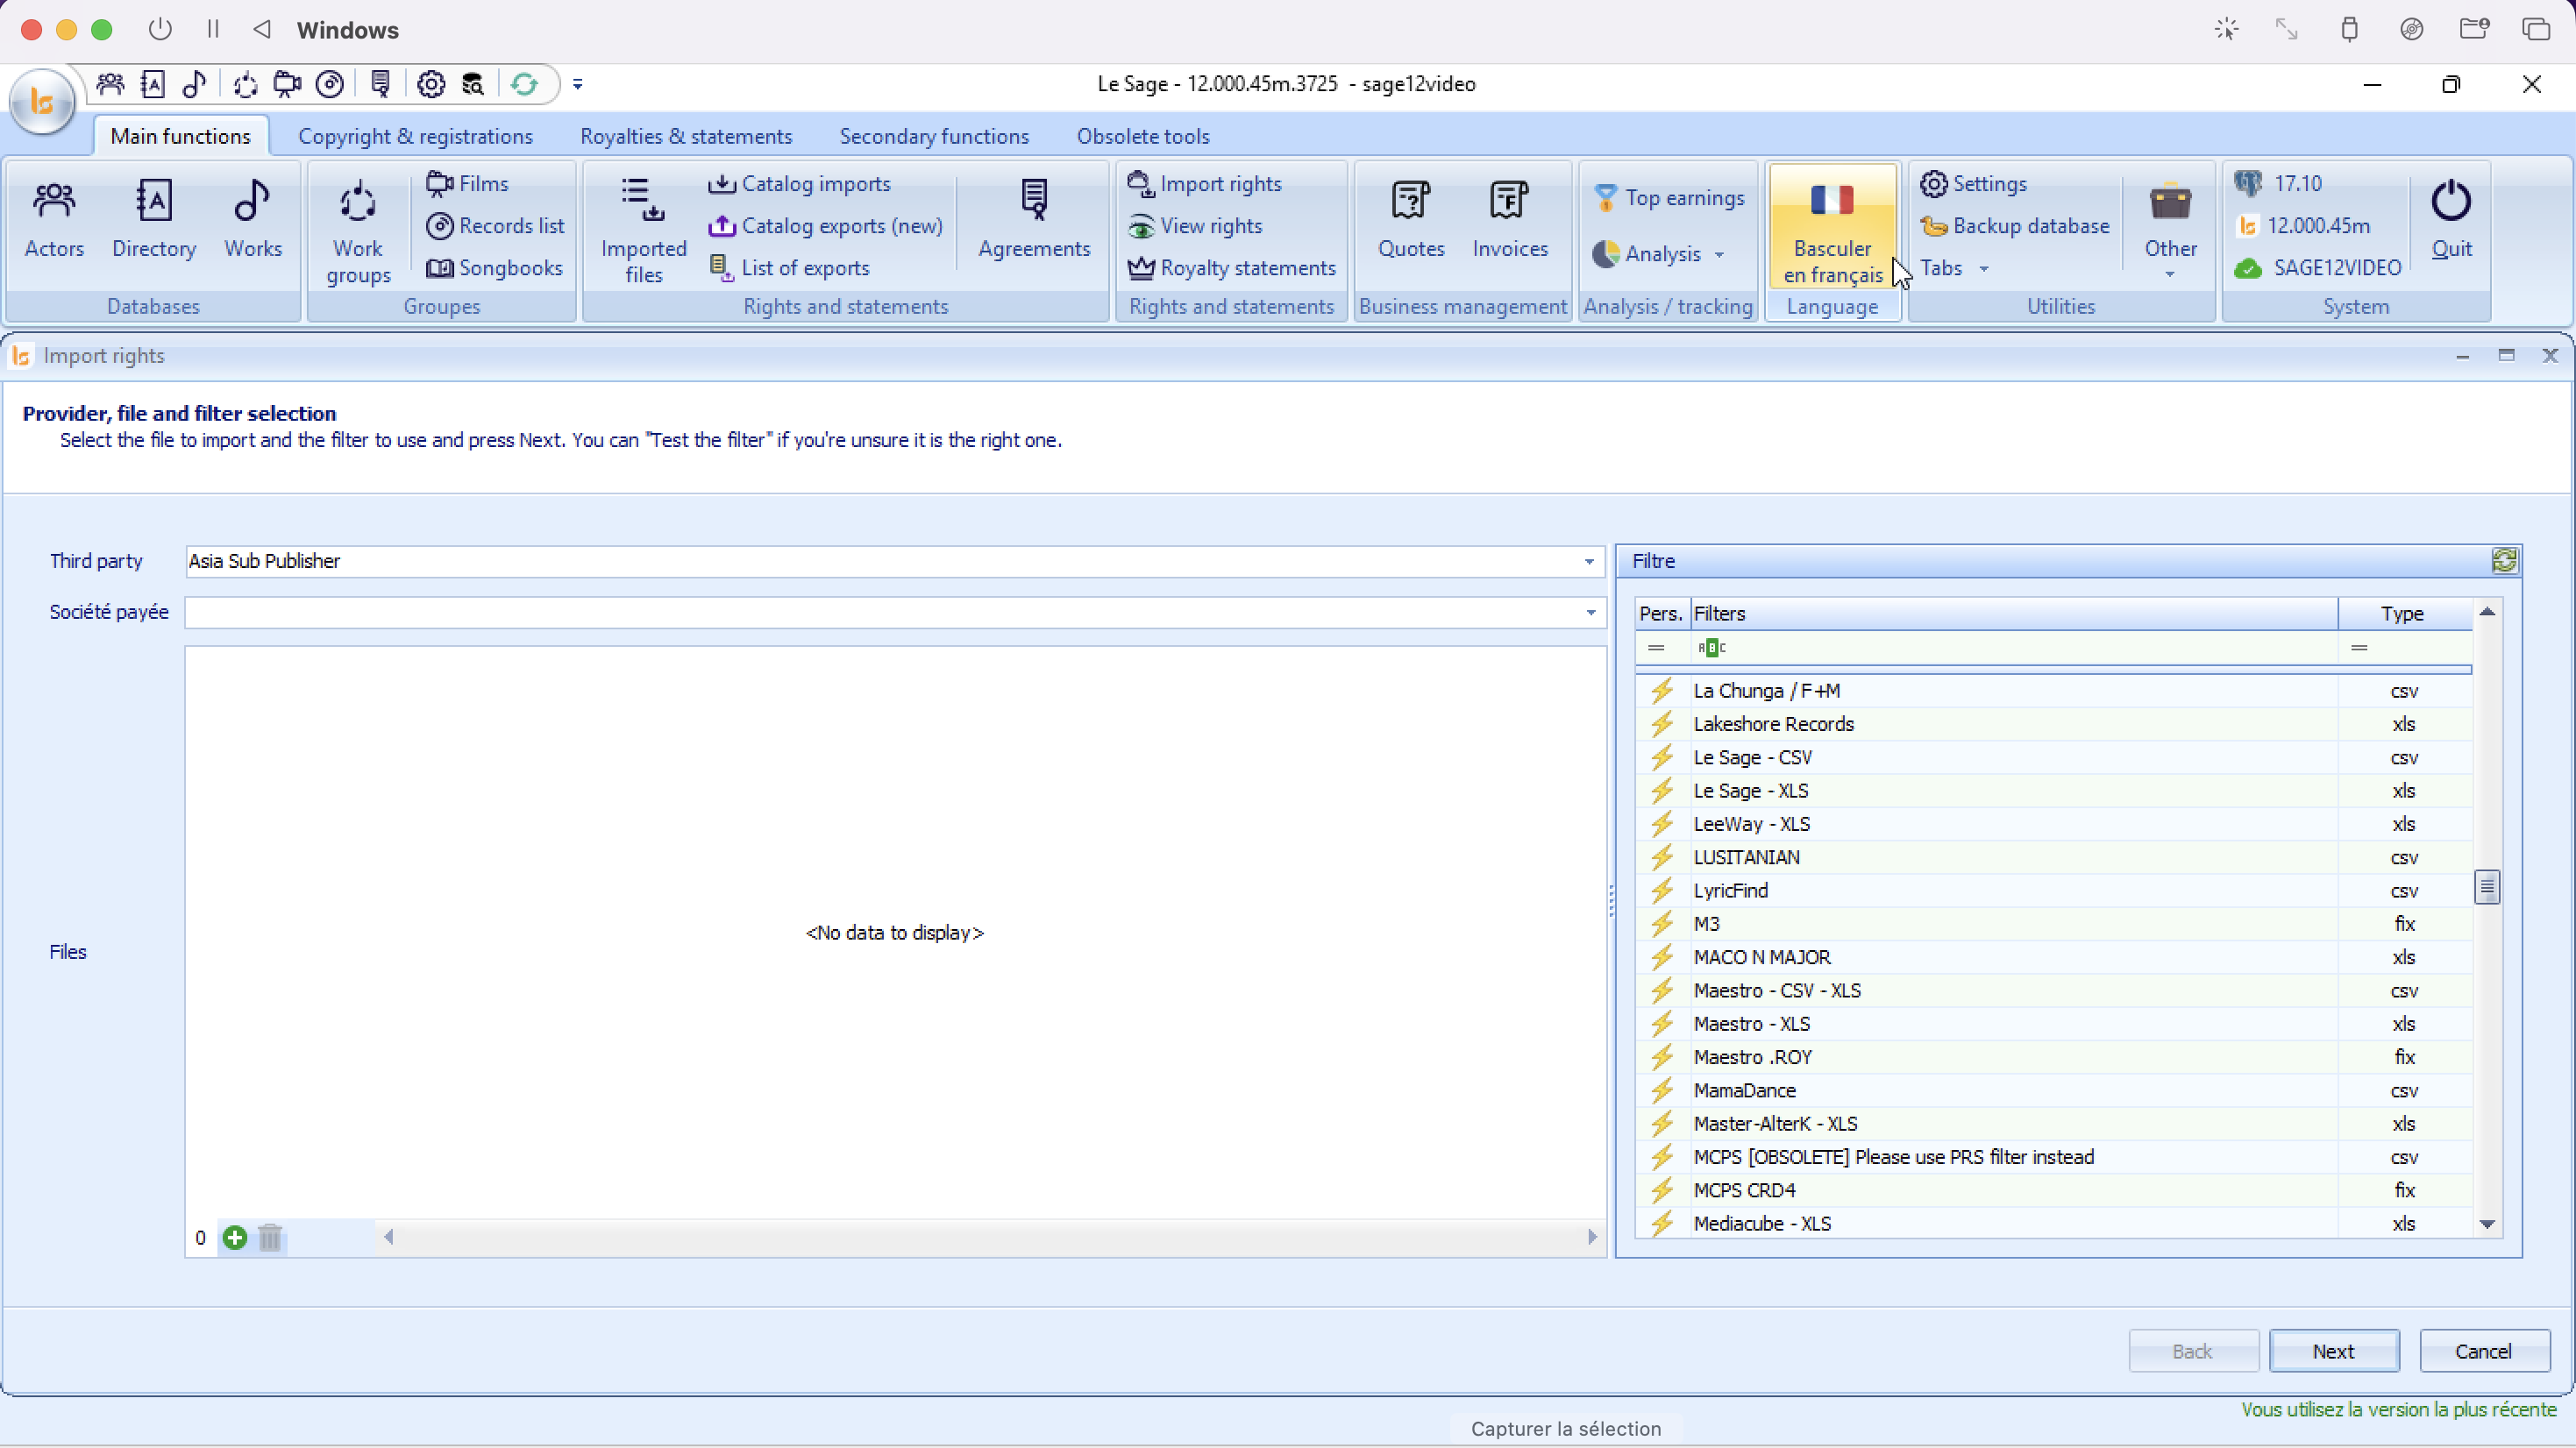
1. Interface Overview
The interface requires you to specify accountability links alongside your file and parsing filter selections:
-
Left Section (Accountability & Files): Dropdowns to assign who sent the money/data, and the file uploader tool.
-
Right Section (Filtre): The template list specifically calibrated for rights and financial data structures (e.g., LyricFind, MCPS, Maestro).
2. Step-by-Step Configuration
Step 1: Define Accountabilities (Third Party & Company paid)
Before choosing files, you must tell the system how to assign the incoming funds:
-
Third party: Click the dropdown and select the external client, publisher, or sub-publisher who provided the statement (e.g., Asia Sub Publisher).
-
Company paid : Select your internal company that received the payment described in the statement.
Step 2: Upload Royalty Files
-
Find the Files section below the dropdowns.
-
Click the + icon at the bottom left to browse your computer and upload your statement files (CSV, XLS, TXT, etc.).
-
Note: Multiple files from the same provider can be added at once if they share the identical file structure. Use the Trash bin icon to clear accidental selections.
Step 3: Map the Royalty Structure (Filter)
-
Scroll or search through the Filter column on the right side.
-
Select the filter matching the source organization or format layout (e.g., choose MCPS CRD4 if processing an MCPS statement).
When importing the file, you must know the sender in order to indicate it in Third Party, as well as choose the appropriate filter. The filter is named after the rights provider. A Third Party may have more than one file type. This is how we have four filters for SACEM, for example, as they can send several different formats. If you do not find a filter corresponding to your rights provider, please send us the file with the name of the provider.
3. Action Buttons & Navigation
| Button | Action |
| Back | Returns to the previous menu dashboard (disabled during initial step). |
| Next | Starts parsing the financial values and advances to the preview and calculation step. |
| Cancel | Wipes the current setup selections and closes the Import rights module. |
Options
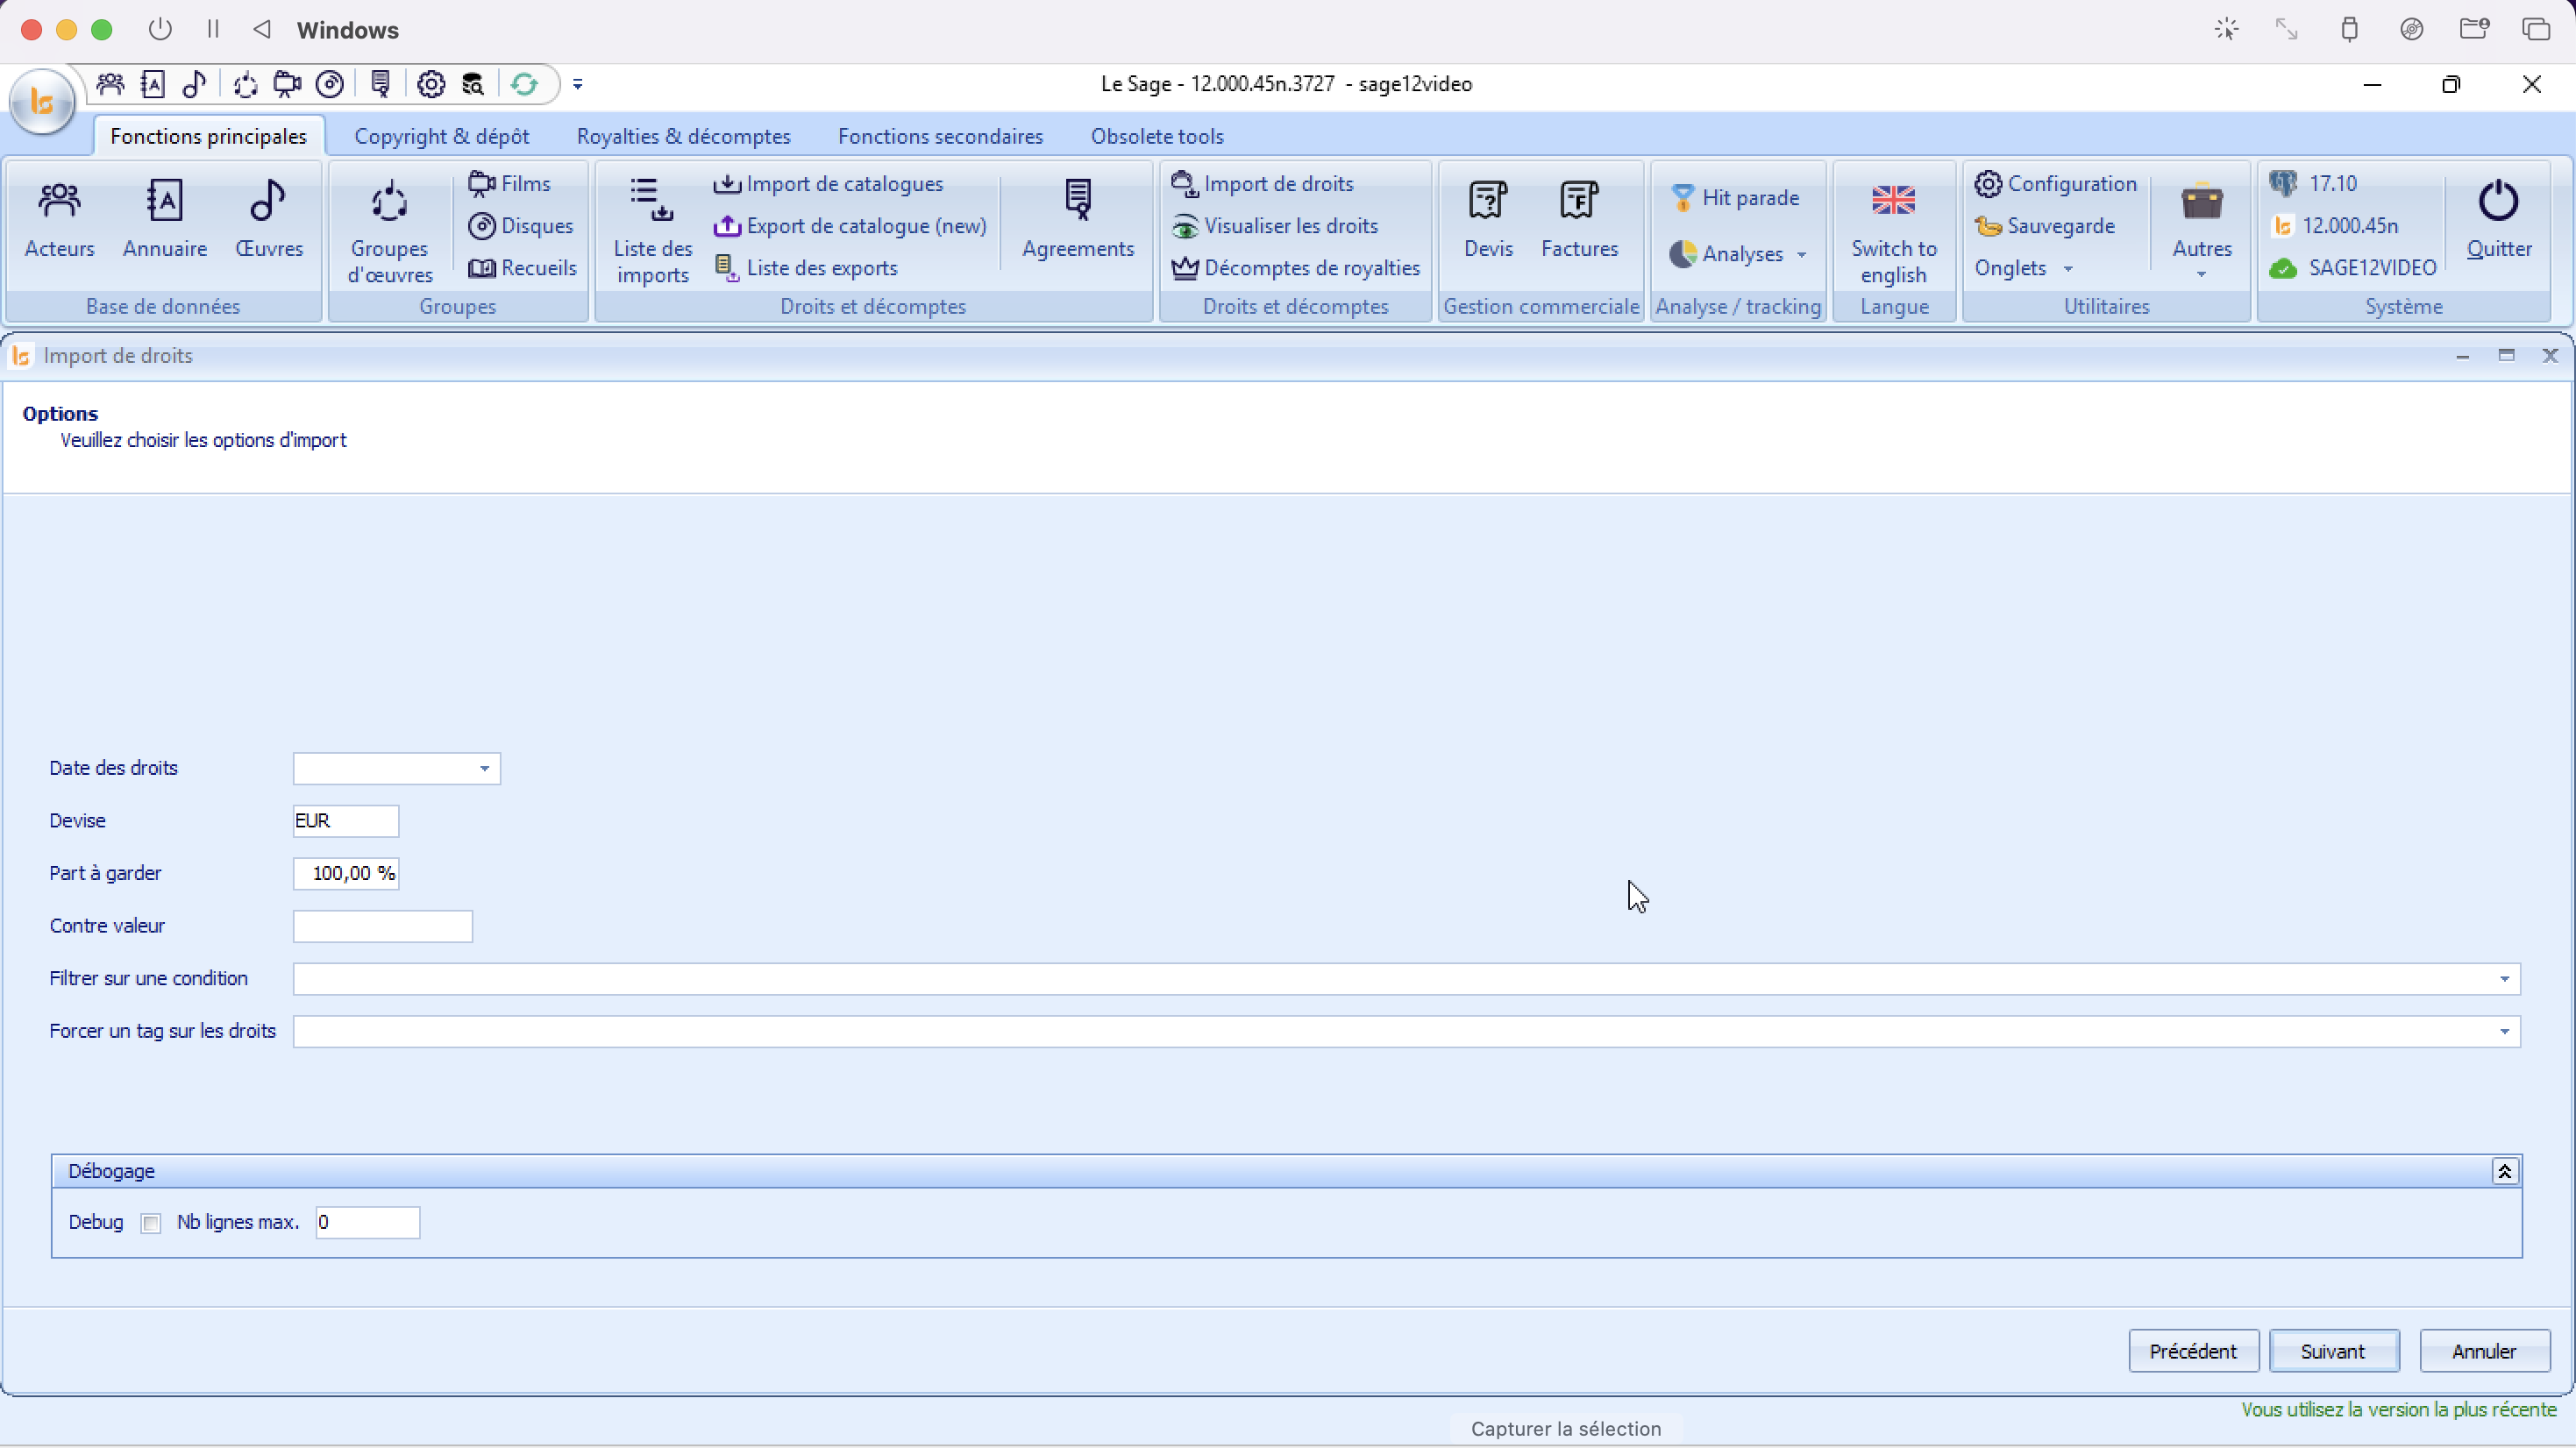
After selecting your statement file, third party, and parsing filter, clicking "Next" opens the Options page. This screen allows you to configure financial variables, apply currency conversions, and set up metadata rules for the incoming royalty entries.
1. Setting Up Financial and Administrative Options
Configure the parameters to align with your distribution rules:
-
Rights date: input the accounting/distribution period relevant to this statement (e.g., Q1 2026, H2 2025). This ensures royalties are allocated to the correct financial period.
-
Currency: Defines the base currency of the incoming document. By default, it is configured to currency defined as the default one in the Stettings. Modify this code if your statement uses a different source currency (e.g., USD, GBP).
-
Share to keep: Determines what percentage of the incoming money is retained by your company before sub-distribution. By default, it is set to 100,00% (meaning your company retains the entire gross amount, or commission calculations will follow default contract rules).
-
Counter value: If the statement currency differs from your system's main accounting currency, enter equivalent value in your currency accurately.
-
Filter on a condition: Use this dropdown to apply a specific logical rule to the import, parsing only the line items that meet a custom set criteria.
-
Force a rights tag: Allows you to automatically apply a specific tag to apply a special rule to the payout of the rights.
Debug: Located at the bottom of the window. Exclusively for us.
Statement Summary
Once the software finishes parsing your rights or royalty statement file, it advances to the Compte rendu screen. This stage provides a breakdown of the imported sheets, data volume, extracted financial sums, and parsing warnings before committing the records to your live ledger.
1. Interface & Grid Layout
The main table acts as a structured tree menu. Clicking the small Minus ($-$) or Plus ($+$) square icon on the far left expands or collapses individual sheets found inside your uploaded file.
Main File Attributes
-
File name: Displays the path of the processed spreadsheet (e.g.,
Z:\Downloads\GRANDS DROITS V2.xlsx). -
Nb lines: The total count of data rows successfully scanned (e.g.,
70lines). -
Amount / Amount in currency: The total aggregate financial royalty sum extracted from the document (e.g.,
184 214,37).
2. Reading Error Messages and Workbook Sheets
When expanding a multi-sheet spreadsheet workbook (e.g., Excel files with several tabs), Le Sage evaluates each tab independently:
-
Successful Tabs (e.g., Feuil1): * Displays the subtotal financial Amount parsed specifically from that single sheet.
-
The Active zones column indicates which named script or data layout template successfully mapped the rows.
-
-
Tabs with Errors/Warnings (e.g., Feuil2):
-
Message / Last error: Displays parsing flags such as
Headers not found. -
What this means: This alert indicates that a specific sheet inside your Excel file (like Feuil2) does not contain the expected data columns or is an empty layout tab. If the financial totals on the successful sheets match your physical statement statement balance, this warning can safely be ignored.
-
3. Investigating Logs & Interactive Details
💡 Pro-Tip: As noted in the subtitle instruction, you can double-click directly on any row or sheet line item to trigger a drill-down window displaying a detailed row-by-row view of the data.