Catalog Import
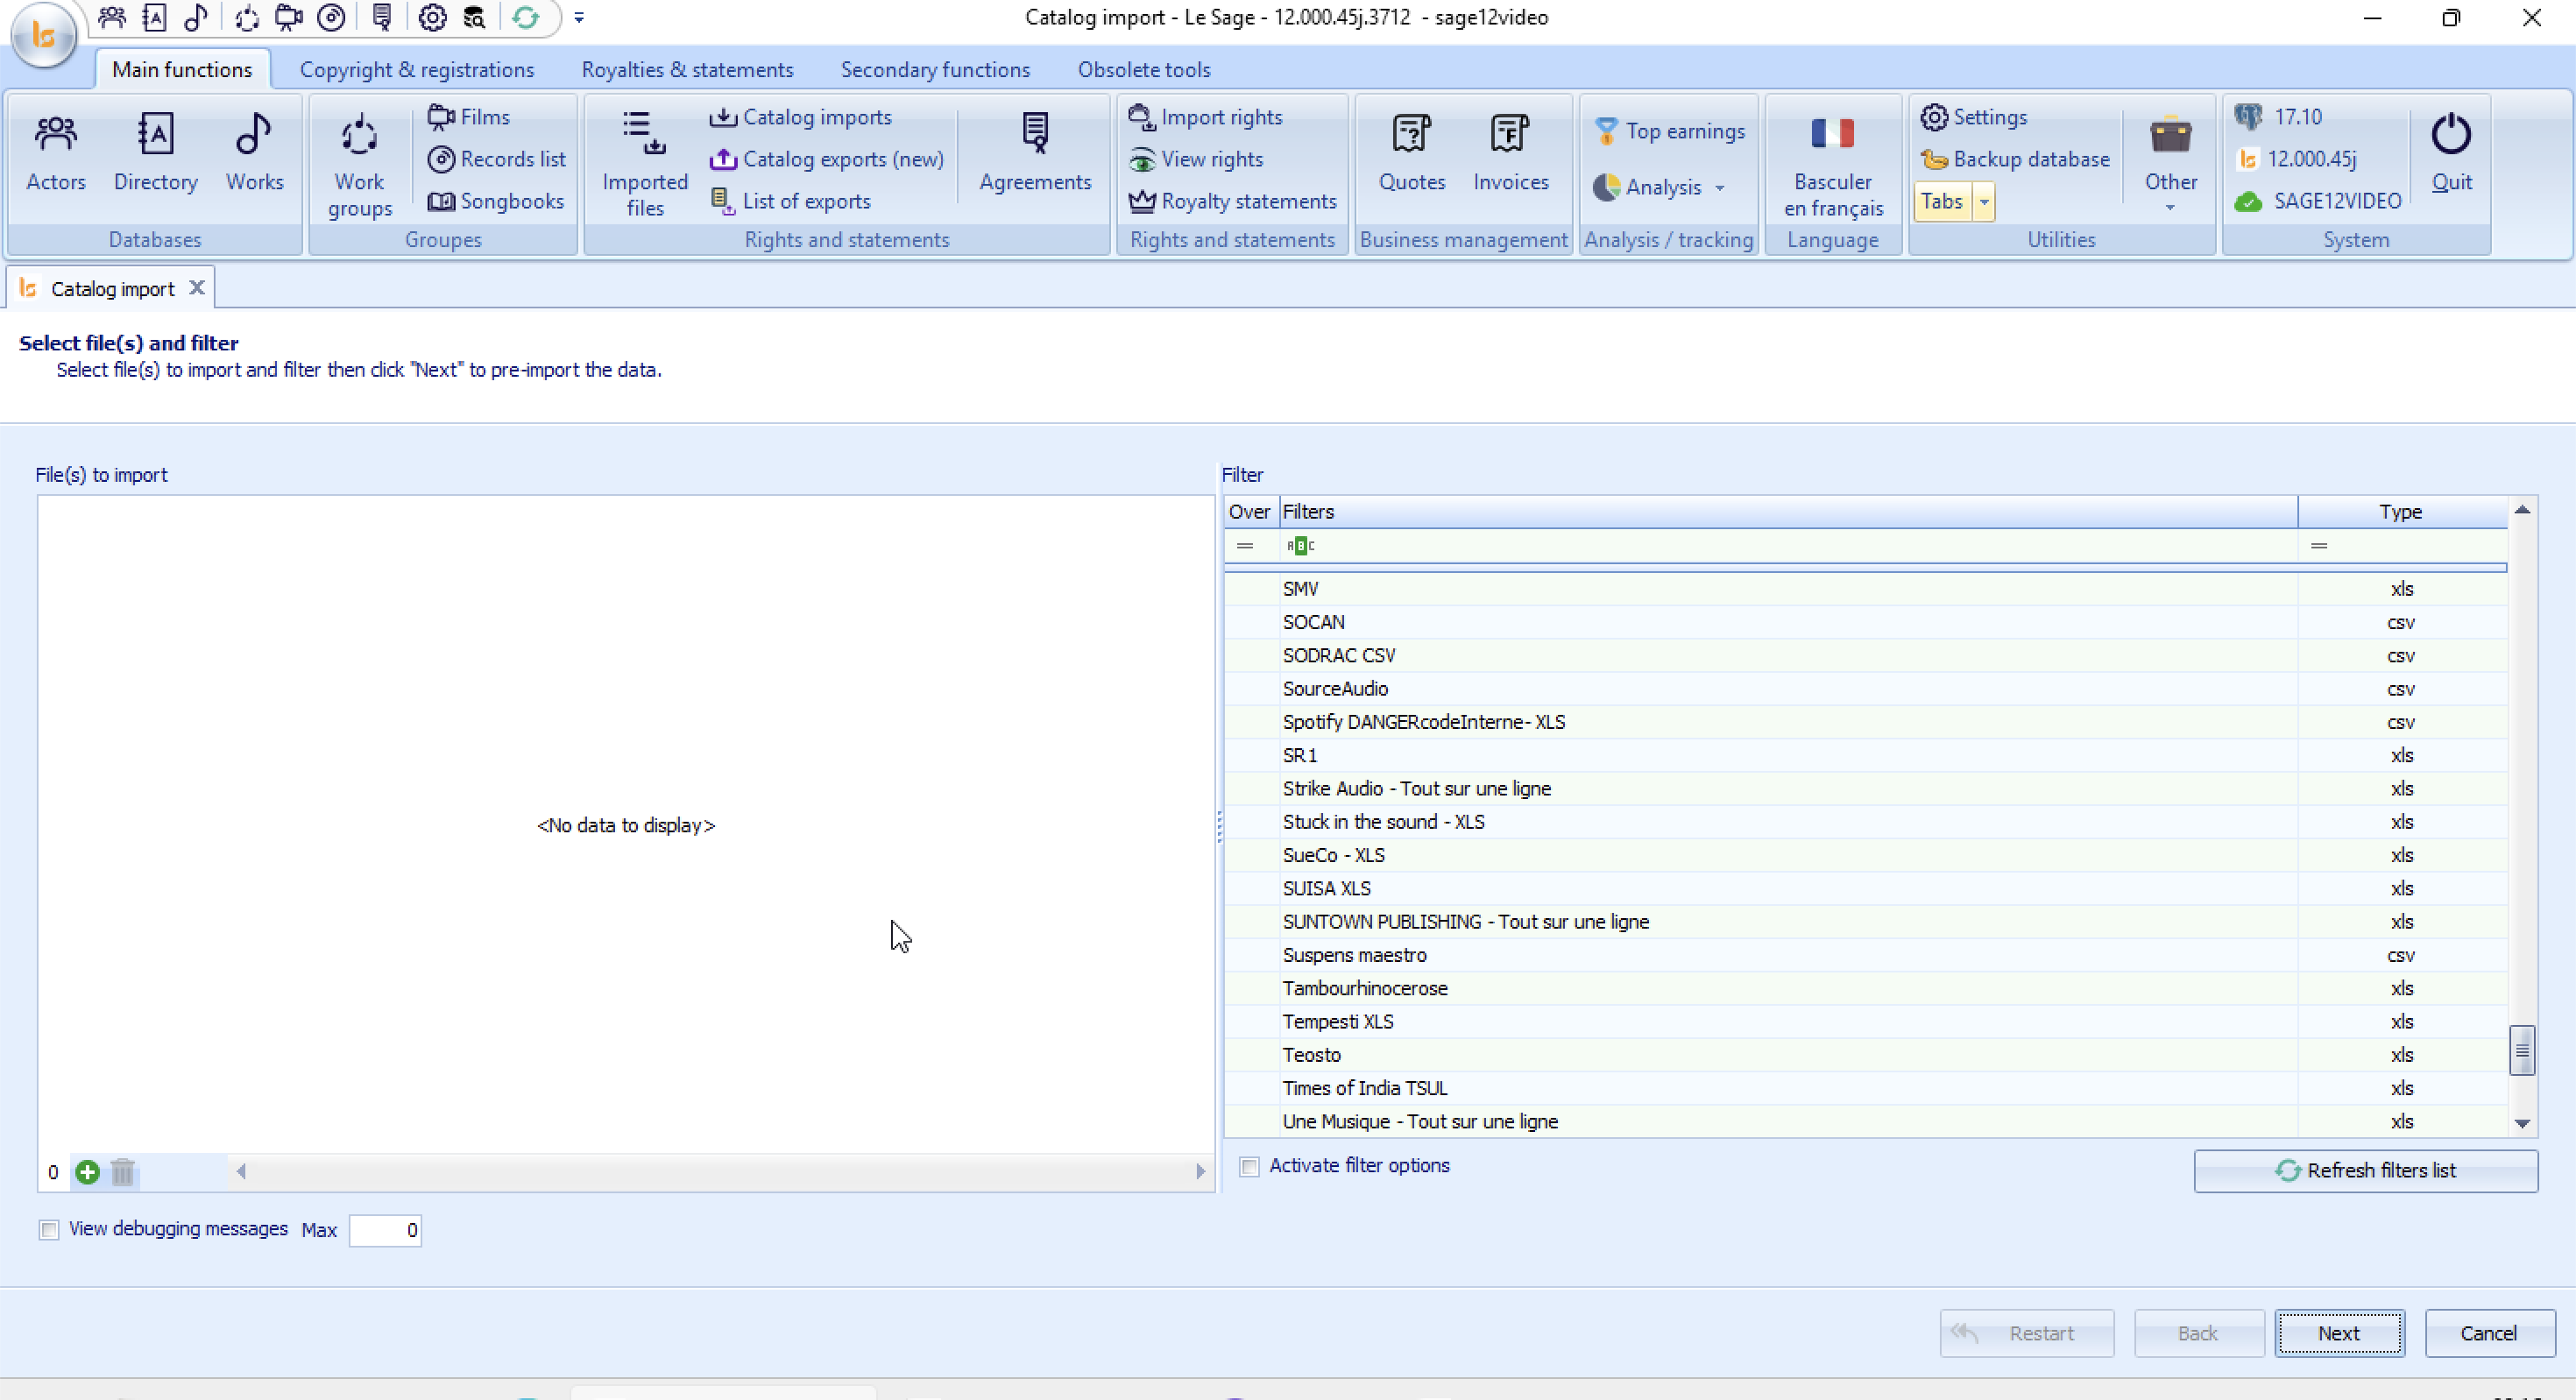
This page allows you to upload external data files (catalogs, tracks lists, etc.) whatever the source and format (except PDFs) and apply a specific conversion filter tailor made to every version.
The screen is divided into two main sections:
-
Left Side (File(s) to import): The area where you select and manage the files you want to upload.
-
Right Side (Filter): The list of available import filters designed to properly parse the format of your files.
1. Step-by-Step Import Procedure
Step 1: Select the File(s) to Import
-
Add the File(s) to import in the zone on the left (currently showing
<No data to display>). -
Click the + icon at the bottom left of this area to browse your computer and add one or multiple files that have the same format.
-
Note: If you select the wrong file, highlight it and click the Trash bin icon right next to the plus button to remove it from the list.
Step 2: Choose the Correct Conversion Filter
The software needs to know how to read your file. You must match it with the correct profile in the Filter section (on the right).
-
Use the search/filter row or scroll through the list to find the filter that matches your provider or data structure (e.g., SOCAN, Spotify, SUISA XLS, etc.).
-
Check the Type column (xls, csv) to ensure your original file format matches the format expected by the filter.
-
Click on the filter to select it (it will be highlighted).
💡 Tip: If you have recently added or modified a filter and it does not appear in the list, click the "Refresh filters list" button at the bottom right of the filter section.
If you do not find the filter to import your file, send it to us with the name of the provider and we will - send you a new filter or an updated version that you will copy/paste/replace in c:/LeSage12/FIlters.
Step 3: Validate and Proceed to Pre-Import
-
Once your file is loaded and the correct filter is selected, click the "Next" button in the bottom right corner of the screen.
-
The software will then process the file and move to the pre-importation phase to analyze the data before final integration.
Action Buttons & Navigation
| Button | Action |
| Restart | Resets the entire page to start the operation over from scratch. |
| Back | Returns to the previous step (disabled by default on this initial screen). |
| Next | Validates current selections and proceeds to the next step of the import process. |
| Cancel | Aborts the current operation and closes the import window. |
💡 View debugging messages - only for us : Located at the bottom left. Checking this box displays technical debug messages. This is primarily used if you encounter an error during file analysis and technical support requests the application logs. You can limit the number of displayed messages using the "Max" field.
2. Import Preview
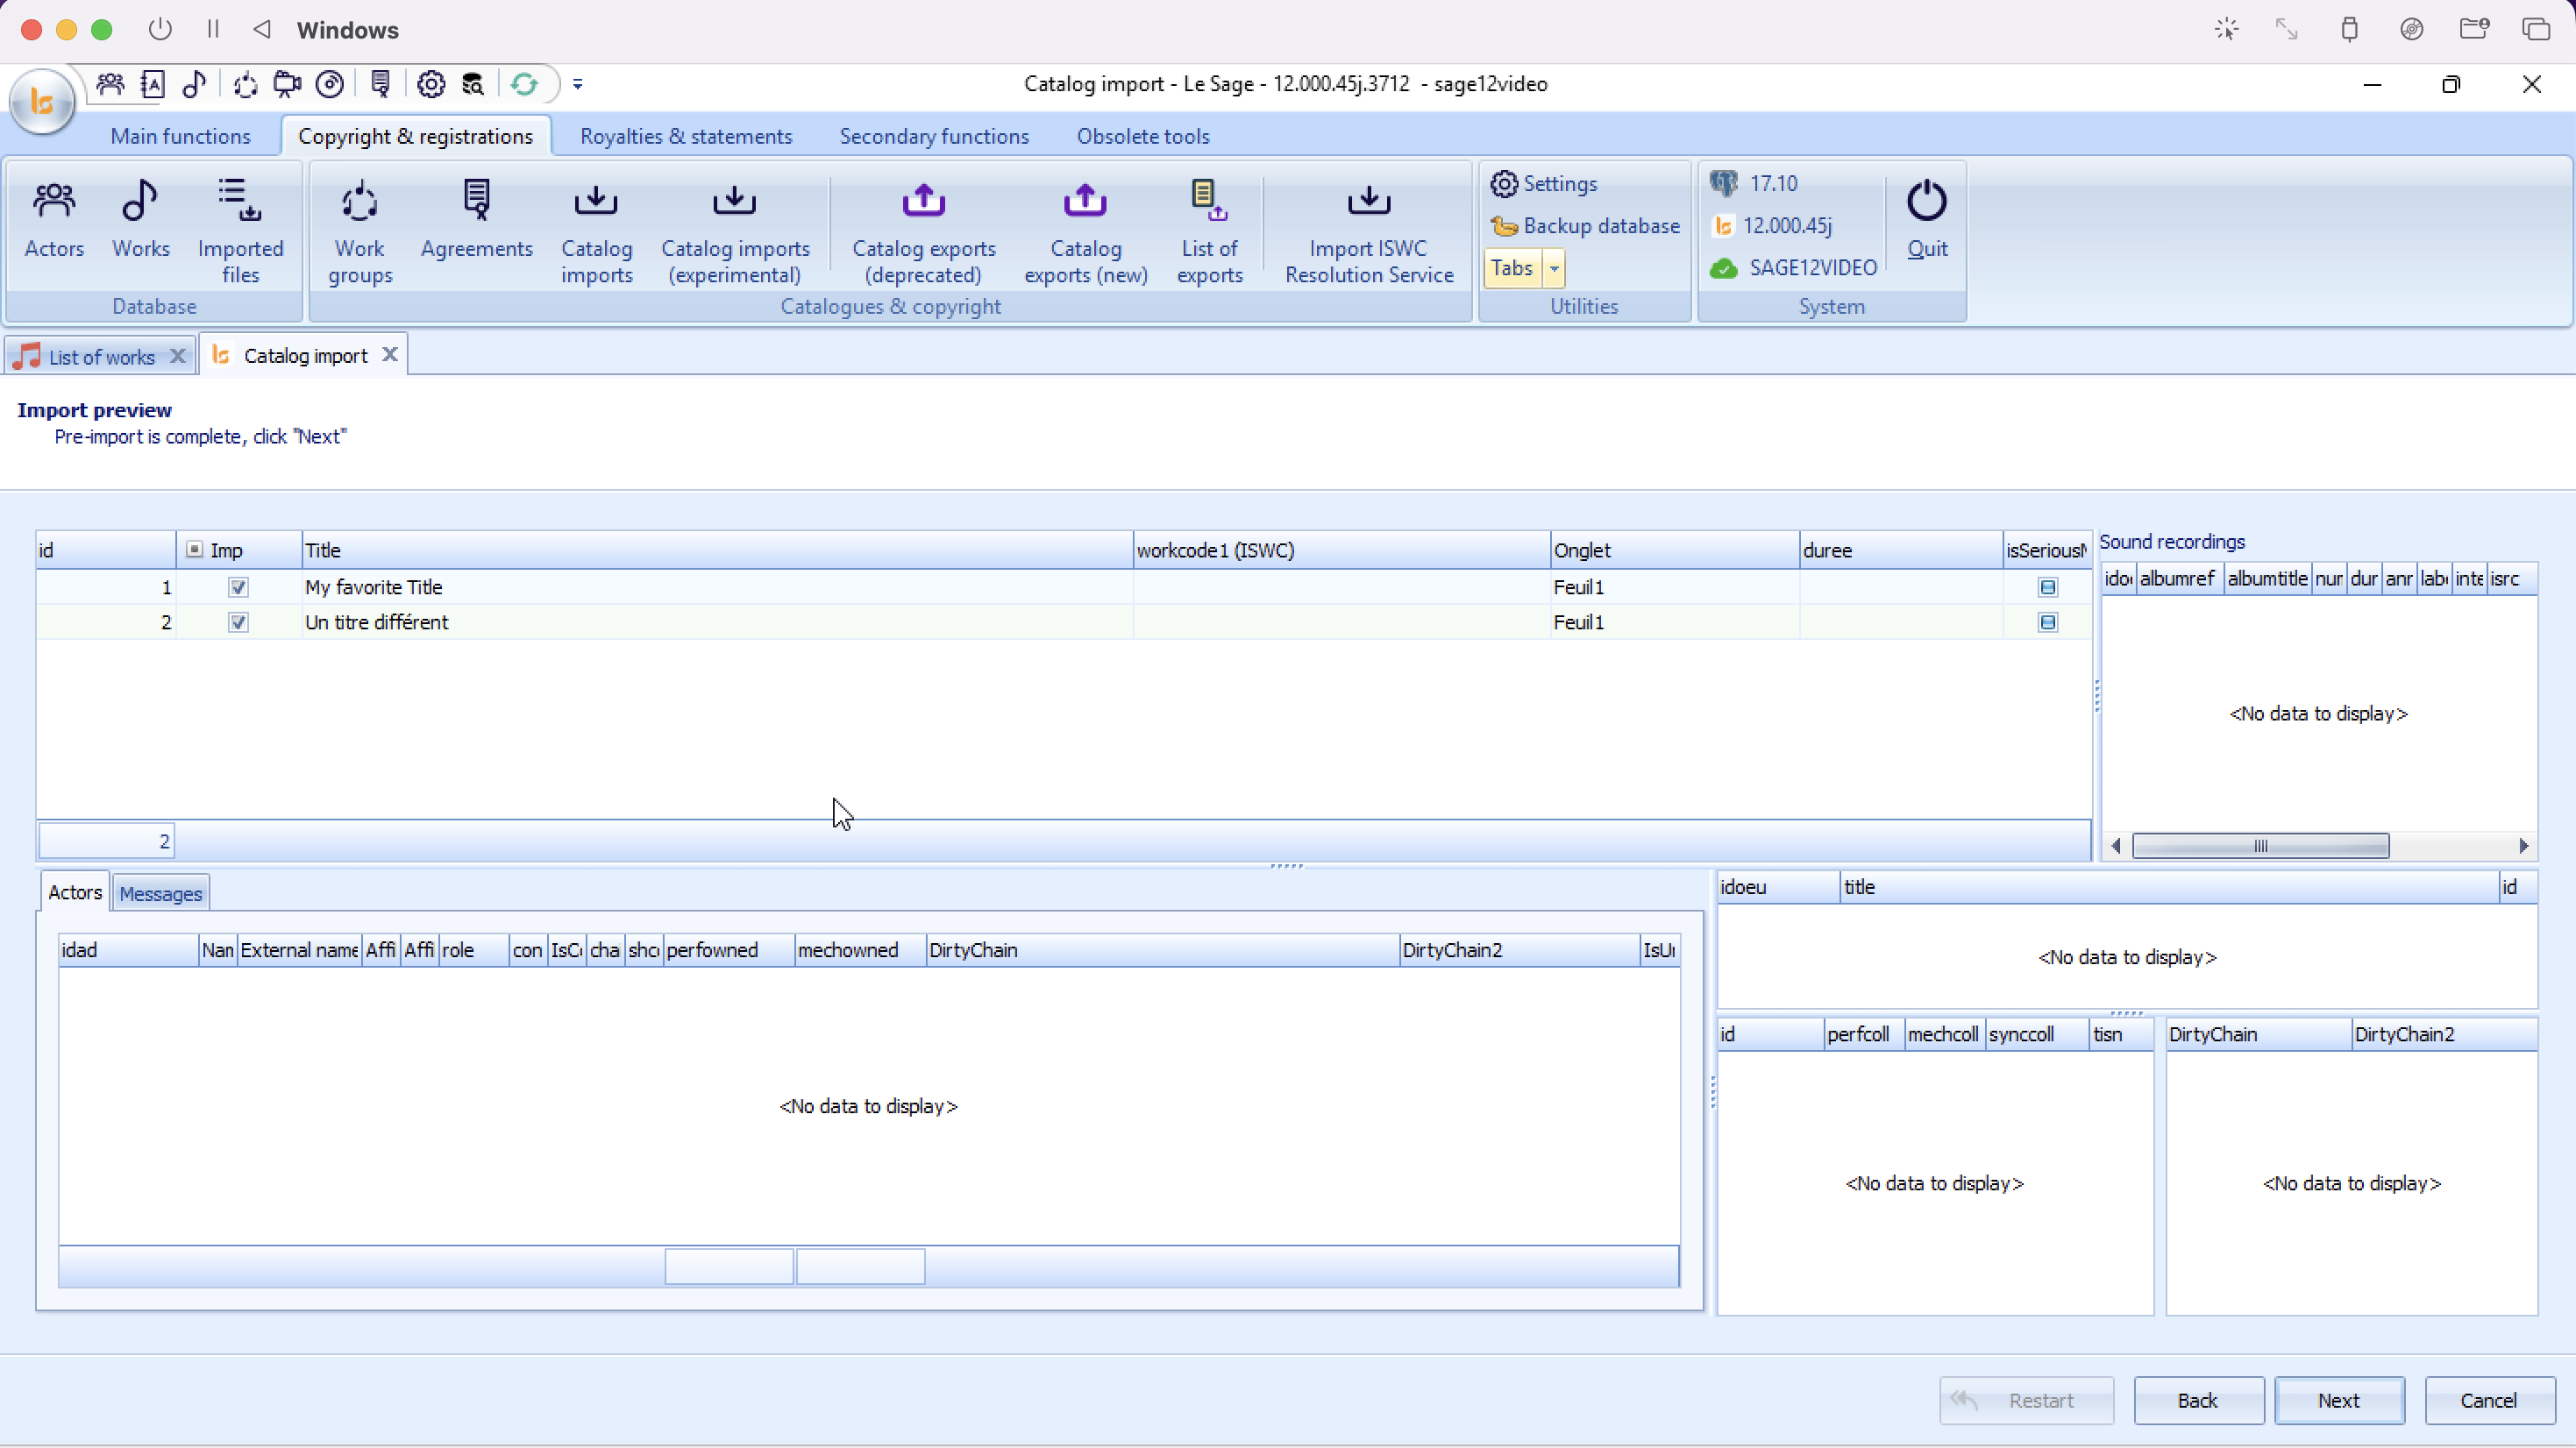
Once you click "Next" on the initial catalog import screen, the software processes your file and opens the Import preview tab. This page allows you to review the parsed data and ensure everything is correct before finalizing the integration into the database.
1. Interface Overview
The preview screen is divided into several analytical panes:
-
Main Data Grid (Top Center): Displays the primary records found in your file (e.g., work titles, codes, and durations).
-
Sound Recordings (Top Right): Shows any audio recordings information linked to the selected work.
-
Actors / Messages (Bottom Left): Displays copyright (composers, publishers, etc.) or validation errors/work numbers/status of the works after CWR registration submission.
-
Linked Data Panes (Bottom Right): Displays additional technical identifiers, collection metadata, or mechanical right breakdowns.
2. Reviewing and Filtering Data
Managing the Main Data Grid
The status text at the top confirms: "Pre-import is complete, click 'Next'". Before you do, verify the parsed items:
-
The 'Imp' (Import) Checkbox: By default, all successfully parsed rows are checked. If you notice a row you do not want to import, simply uncheck its box in the Imp column.
-
Data Inspection: Click on any row in the main grid (e.g., My favorite Title). Selecting a row will dynamically update all the other sub-panes on the screen with details specific to that entry.
Reading the Sub-Panes
-
Actors Tab: Displays the names, roles, and affiliation societies (e.g., ASCAP, BMI, SACEM) found for the selected work.
-
Messages Tab: If you are importing an ACK you can see the messages left by the CMO.
-
Sound Recordings: If your file includes ISRC codes or master recording data, they will populate here for the highlighted work.
3 - Validation Options
After reviewing your data in the preview tab and clicking "Next", the software opens the Validation options page. This step allows you to define how the imported data should interact with your existing database.
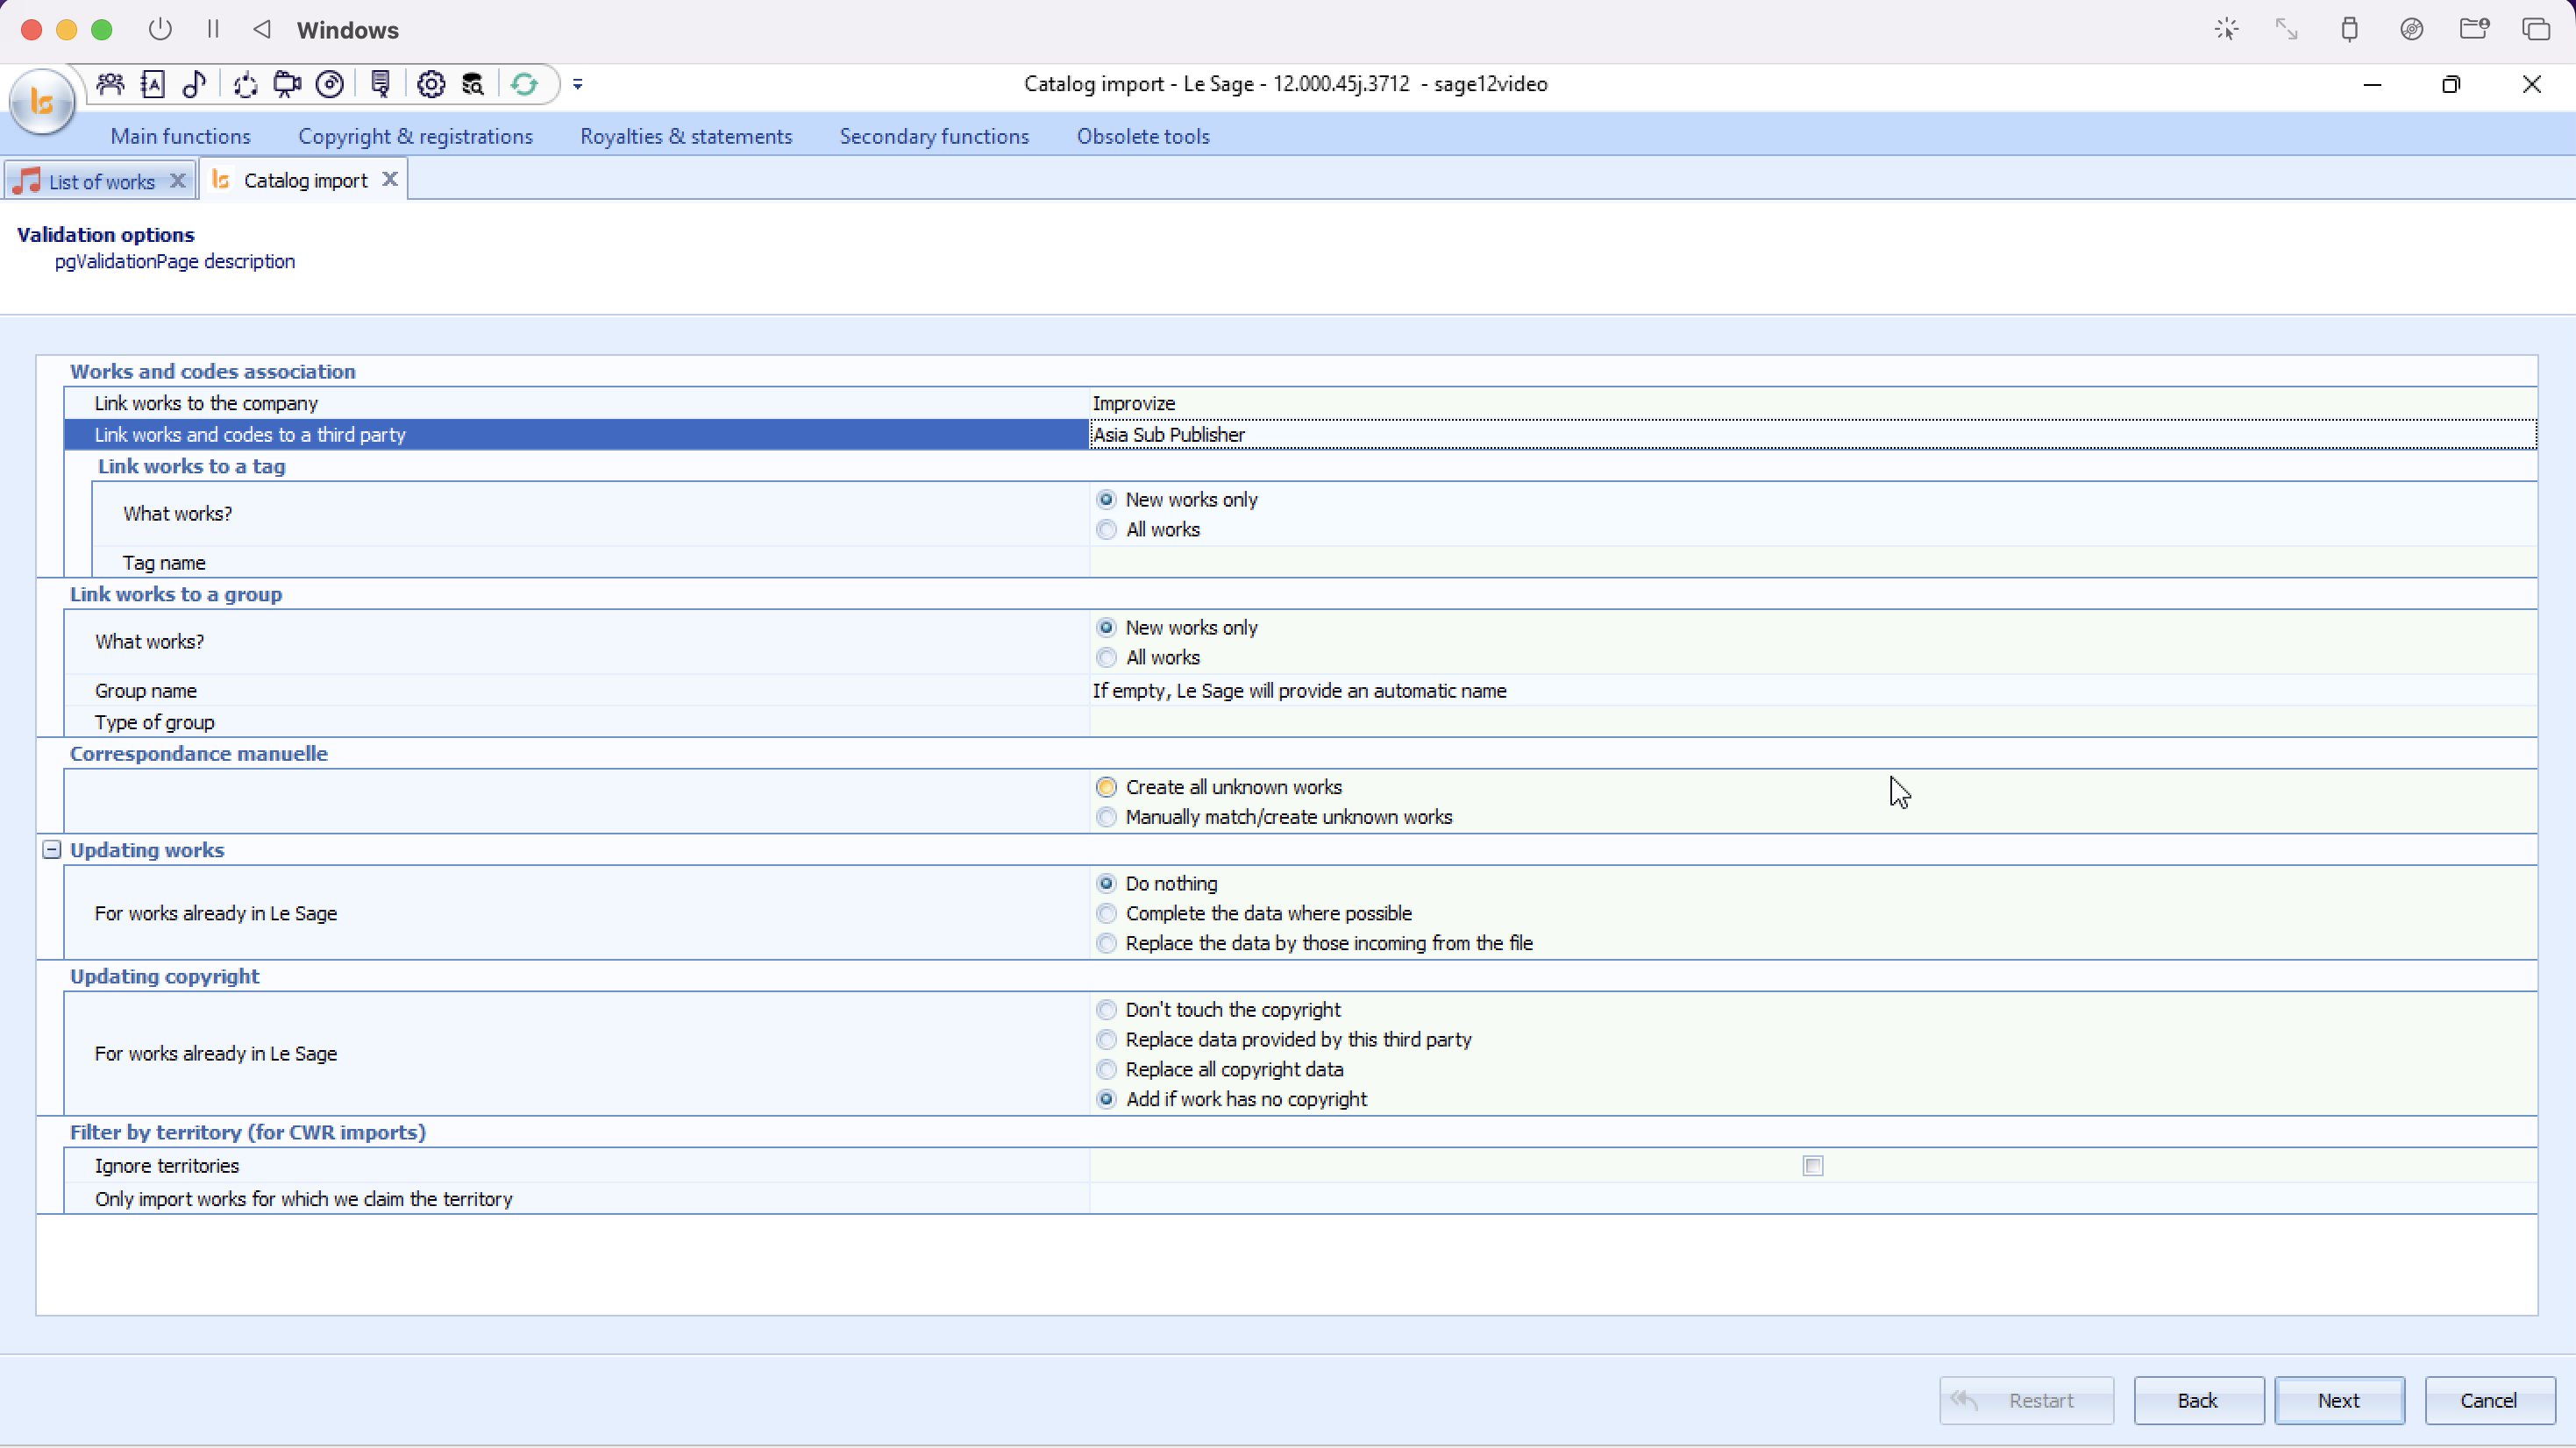
This page is structured into several operational blocks where you define how you data will be ingested.
1. Works and Codes Association
This section links the imported catalog items to your company or specific partners.
-
Link works to the company: Automatically associates the records with the correct company that will deal with royalties for these works.
-
Link works and codes to a third party: Links the works to the provider of the file (e.g., Asia Sub Publisher).
It is an important selection as the work codes will be linked to that source. The internal code n°1234567 from a Publisher A will not be the same work as the work code 1234567 of Publisher B. As the system matches on codes blindly you must make sure you link the information coming from the file to the correct provider.
-
Link works to a tag: Allows you to tag the incoming works for easy filtering later.
-
What works? Choose whether to apply the tag to New works only or All works that are in the file.
-
Tag name: Select a tag that you previously have created in "Settings".
-
2. Link Works to a Group
Use this to group the incoming batch of works together within Le Sage.
-
What works? Apply to New works only or All works.
-
Group name: If left blank, Le Sage will automatically generate a name based on the import session.
3. Manual Matching
Determines how the system handles works it cannot automatically identify with codes :
-
Create all unknown works: (Default) Automatically generates a new record for any work not currently recognized in the system.
-
Manually match/create unknown works: In a second matching phase you will be able to compare the works unmatched with the works in your database to make sure not to create duplicates.
4. Updating Works
Defines the behavior if a work being imported already exists in Le Sage (or because it has matches with code or because you will manually say that the work coming in in the same as one in your database) - it concerns the TITLEs and information you find in "Details" within the works :
-
Do nothing: Keeps your existing system data completely untouched.
-
Complete the data where possible: Fills in blanks in your existing database using information from the new file, but does not overwrite existing data.
-
Replace the data by those incoming from the file: Overwrites your current system data with the new file's details.
5. Updating Copyright
Specifies how the software updates the share splits and copyright administration for existing works:
-
Don't touch the copyright: Leaves existing shares exactly as they are.
-
Replace data provided by this third party: Only overwrites copyright information previously tied to this specific third party.
-
Replace all copyright data: Deletes old copyright records for the matching works and writes the new file's splits.
-
Add if work has no copyright: Only injects copyright splits if the work in Le Sage is currently blank.
6. Filter by Territory (for CWR imports)
-
Ignore territories: If checked, the system will not import the actors and collection shares - ADM and SE.
-
Only import works for which we claim the territory: Filters out any works in the file that do not fall under your contractual territories.
4. Finalizing the Import
Once all business rules and radio buttons are configured to your requirements:
-
Click the "Next" button in the bottom right corner.
-
Le Sage will execute the rules chosen above, write the records to the database, and complete the catalog import process.
4- Import Validation & Execution
After configuring your validation options and clicking "Next", the software enters the final phase: Import validation. This screen provides a real-time log window tracking the processing and server-side integration of your catalog data.
1. Interface Overview
This is a processing console displaying sequential timestamps and execution logs.
Understanding the Real-Time Process Log
The text box displays exactly what the software is performing under the hood step-by-step:
-
Data Transfer: e.g.,
Transferring data to server,Transferring works...,Transferring ISRCs...— indicates that the temporary files are being safely sent to the main database cluster. -
Record Generation: e.g.,
Creating imports...,Validating imports— confirms that Le Sage is creating internal database entities and ensuring they pass integrity checks based on the rules you set in the previous step.
Troubleshooting Error Messages
If an issue or ambiguity arises during processing, it will be flagged directly in this log window. For example:
⚠️ Log Warning Example:
column reference "fullname" is ambiguous
-
What this means: This is a database processing message indicating that a field (in this case, a writer or publisher's "fullname") matches multiple conflicting records or is formatted confusingly in the database.
-
Action to take: Send the file to us telling us which filter you used.
2. Finalizing the Process
Once the processing status reaches 100% or stops running updates "VALIDATION COMPLETE":
-
Click "Finish" in the bottom right corner to commit all valid entries, close the Catalog import tab, and return to your main dashboard.
-
If you need to immediately process another file using identical or modified settings, you can click "Restart" instead.
The import is over here if you have chosen to create all the works that didn't latch with the works in your database. The system will have created them and created a group.
If you have chosen manual matching you have to go in "Imports List".
Matching the catalogue : List of Imports
The List of imports window serves as the central log and management console for every import operation executed within Le Sage. From this dashboard, you can monitor the status of imports, undo operations, manage data locks, and look up details of processed files.
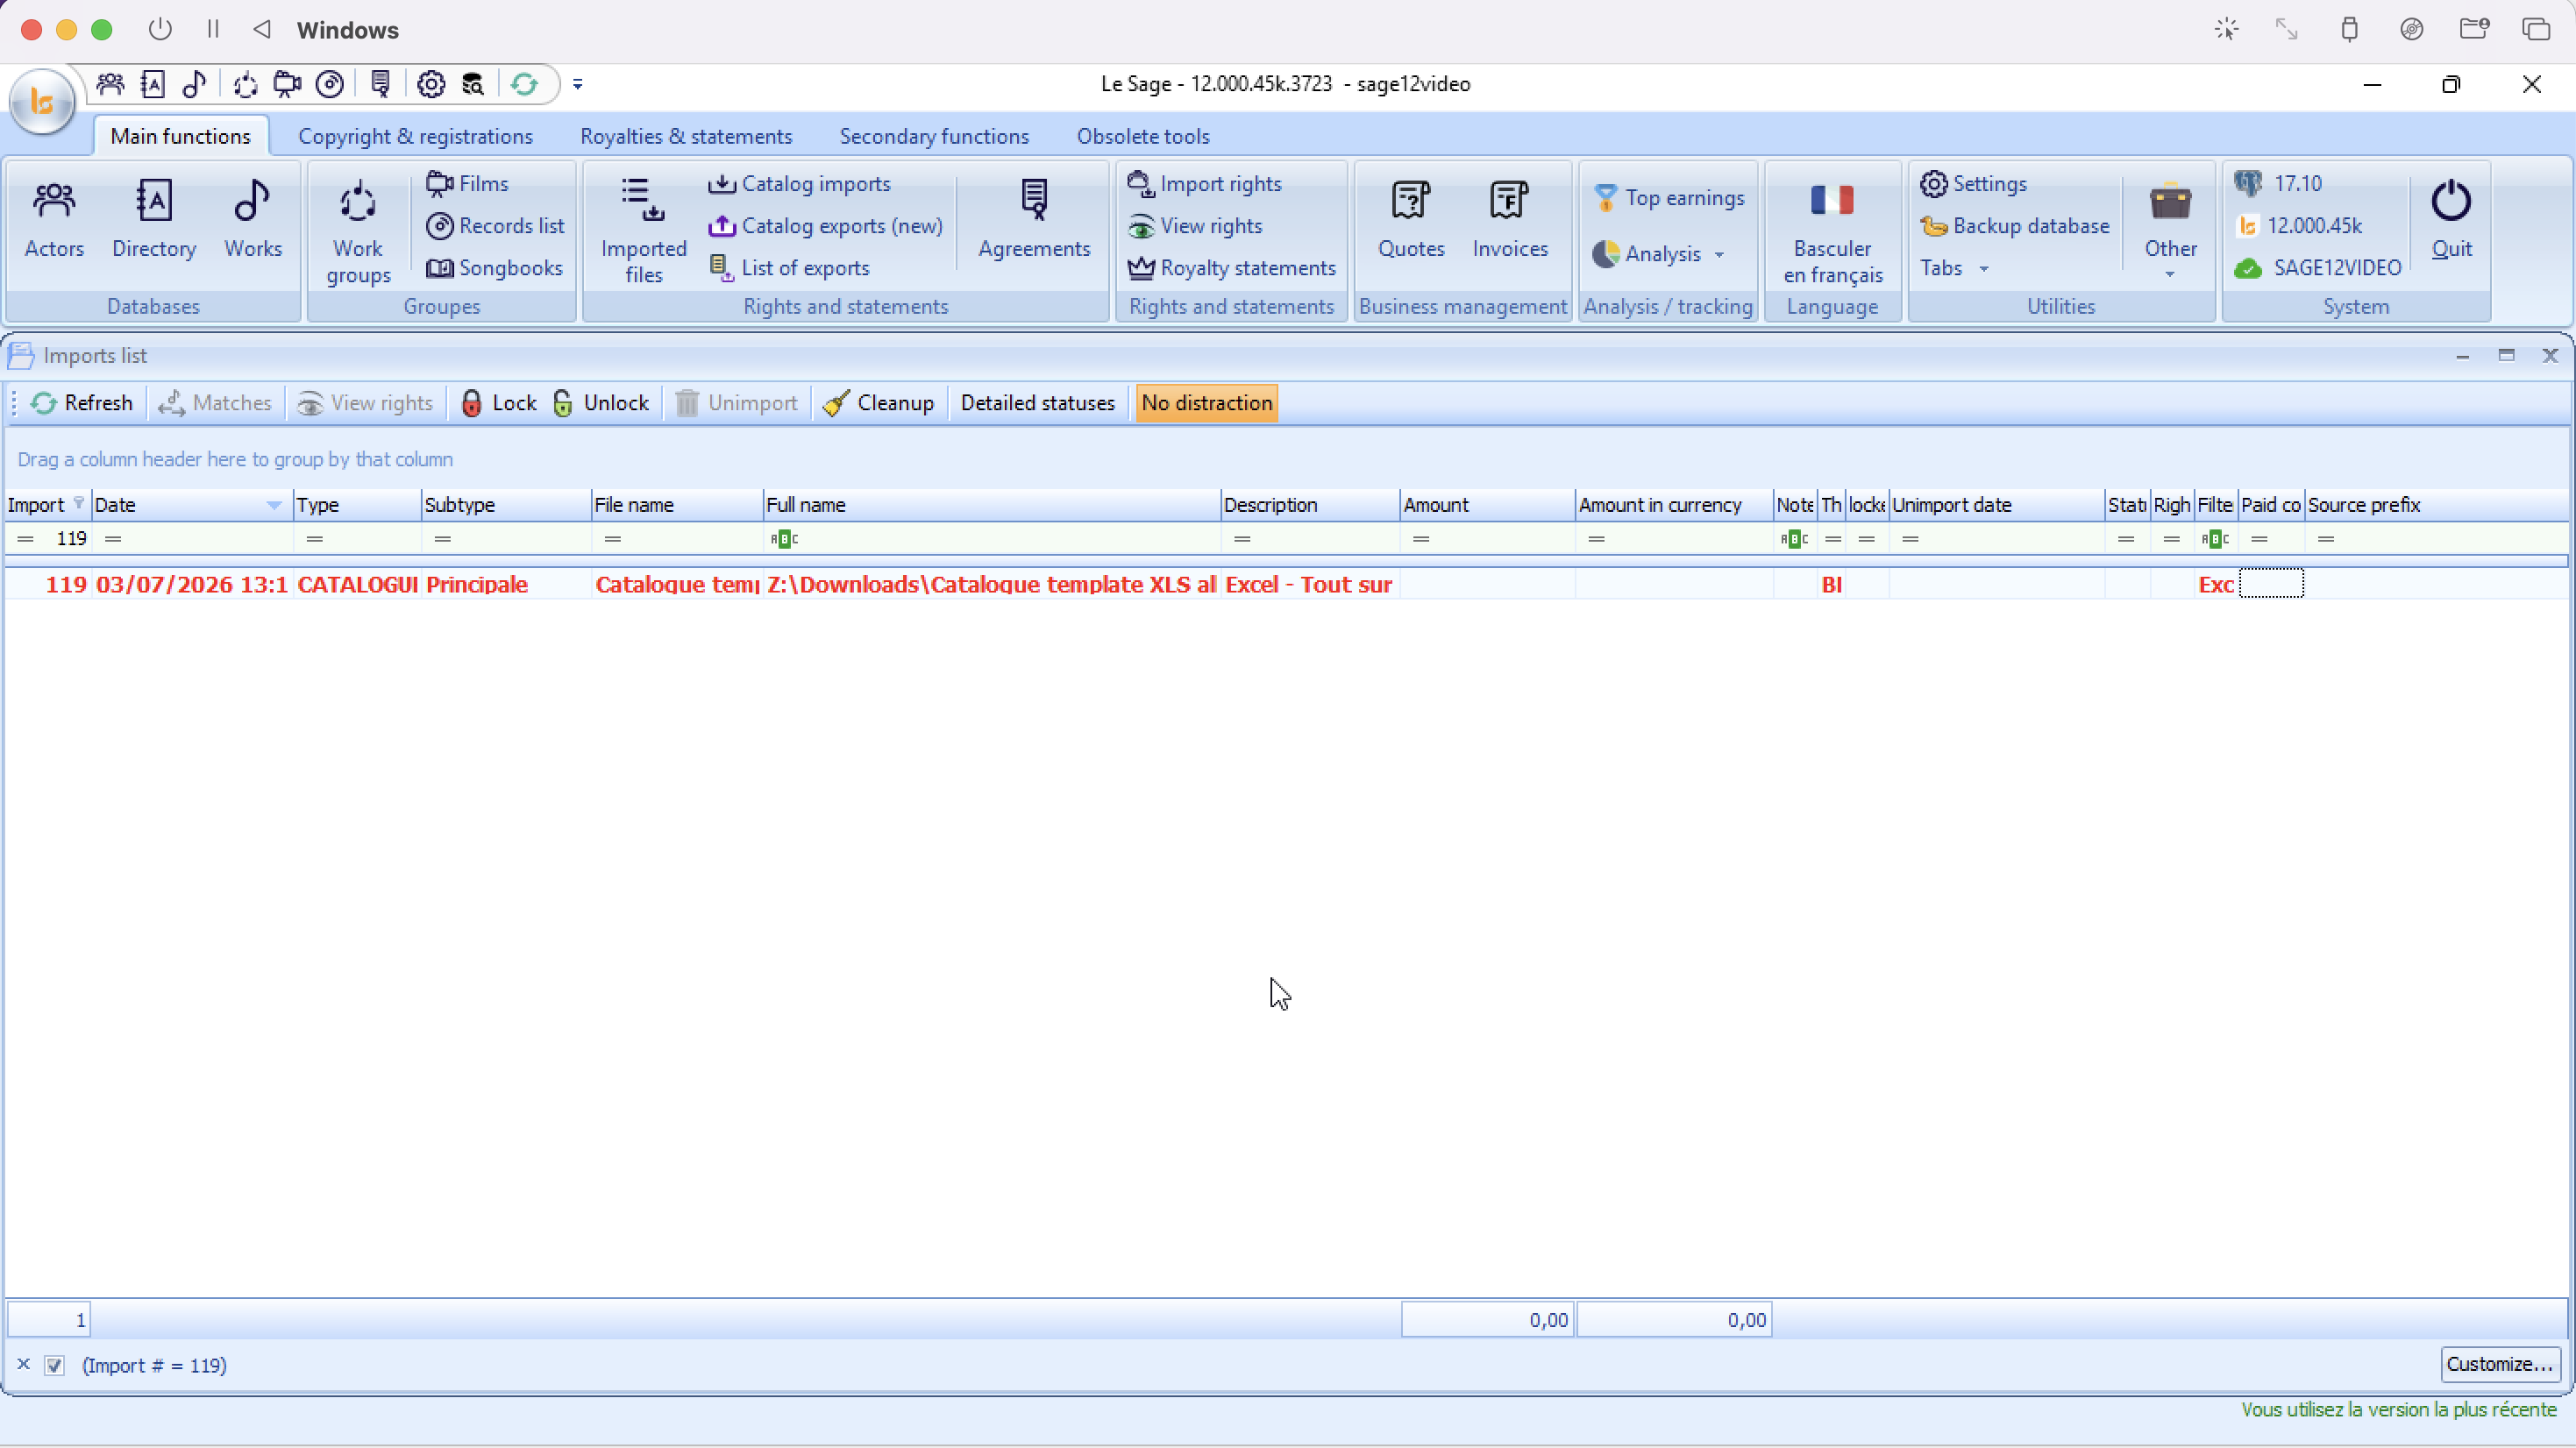
From this page double click on the Catalogue Import in red to proceed with matching.
Here is the manual entry for the manual reconciliation interface, titled Works manual match. This screen opens when you select an import from your list and click Correspondances, or when the system detects unknown data requiring human validation.
Works Manual Match
The Works manual match modal allows you to reconcile incoming titles from an imported file against entries already existing in your database. This prevents the creation of duplicate musical works and ensures that new data is attached to the correct historical records.
1. Interface Layout
The screen is divided down the center into a side-by-side comparison tool:
-
Left Side (Works from the imported file): Shows the titles found in your uploaded spreadsheet that need a decision.
-
Right Side (Existing works): Displays the complete database of musical works currently saved in Le Sage, allowing you to search and select a match.
Beneath both main lists are metadata tabs (Copyright, Codes, Subtitles, etc.) that dynamically update depending on which title you click, helping you compare writer splits, actors, and roles to confirm a correct match.
2. Step-by-Step Reconciliation Actions
For each row in the Works from the imported file grid, you must assign an action using the icons located on the right side of the item line:
Action A: Create as a New Work
If the work is entirely original and does not exist in your system database yet:
-
Highlight the work in the left-hand grid.
-
Click the + button on that item's row.
-
This marks the row to instruct Le Sage to generate a brand-new entry for this asset upon validation.
Action B: Link to an Existing Work (Matching)
If the work already exists in your database (even under a slightly different spelling):
-
Highlight the work in the left-hand grid (e.g., My favorite Title).
-
Go to the right-hand Existing works list and use the search bar filter to look up the correct asset title or ID number.
-
Compare the writers/creators in the bottom panels to make sure it is a true match.
-
Select the matching row on the right grid so it receives a green checkmark icon.
Action C: Ignore / Skip
All these actions can be done on several works. This assigns an action to the work giving it a status it does not directly apply.
3. Key Column Indicators
-
Bad ©: When checked, this box alerts you that the incoming file's copyright share percentages do not total $100\%$ or conflict with standard registration logic.
-
Nb possit (Possible Matches): Displays the number of close textual matches Le Sage automatically found in your database. If it shows a number greater than 0, check the right panel to see if the system has pre-suggested the match for you.
4. Finalizing Your Changes
Once you have processed the rows in your import queue:
-
Apply my actions: Click this button at the bottom center to confirm all associations, create the approved new entries, link matched titles, and push the records into your permanent database ledger.
-
Interrupt validation: Click this button to cancel your matching session, close the window, and preserve the import state with the statuses