Royalty statements
The royalties in Le Sage are the way to pay the rights that enter the system. These royalties can be attached to a work specifically if it is to be treated in isolation, but they can apply to a whole bunch of works at the same time.
Importing rights
The Import rights module allows you to ingest royalty statements, sales reports, and digital performance distribution files. This data is linked directly to a specific third party or collection society to process income data across your catalog.
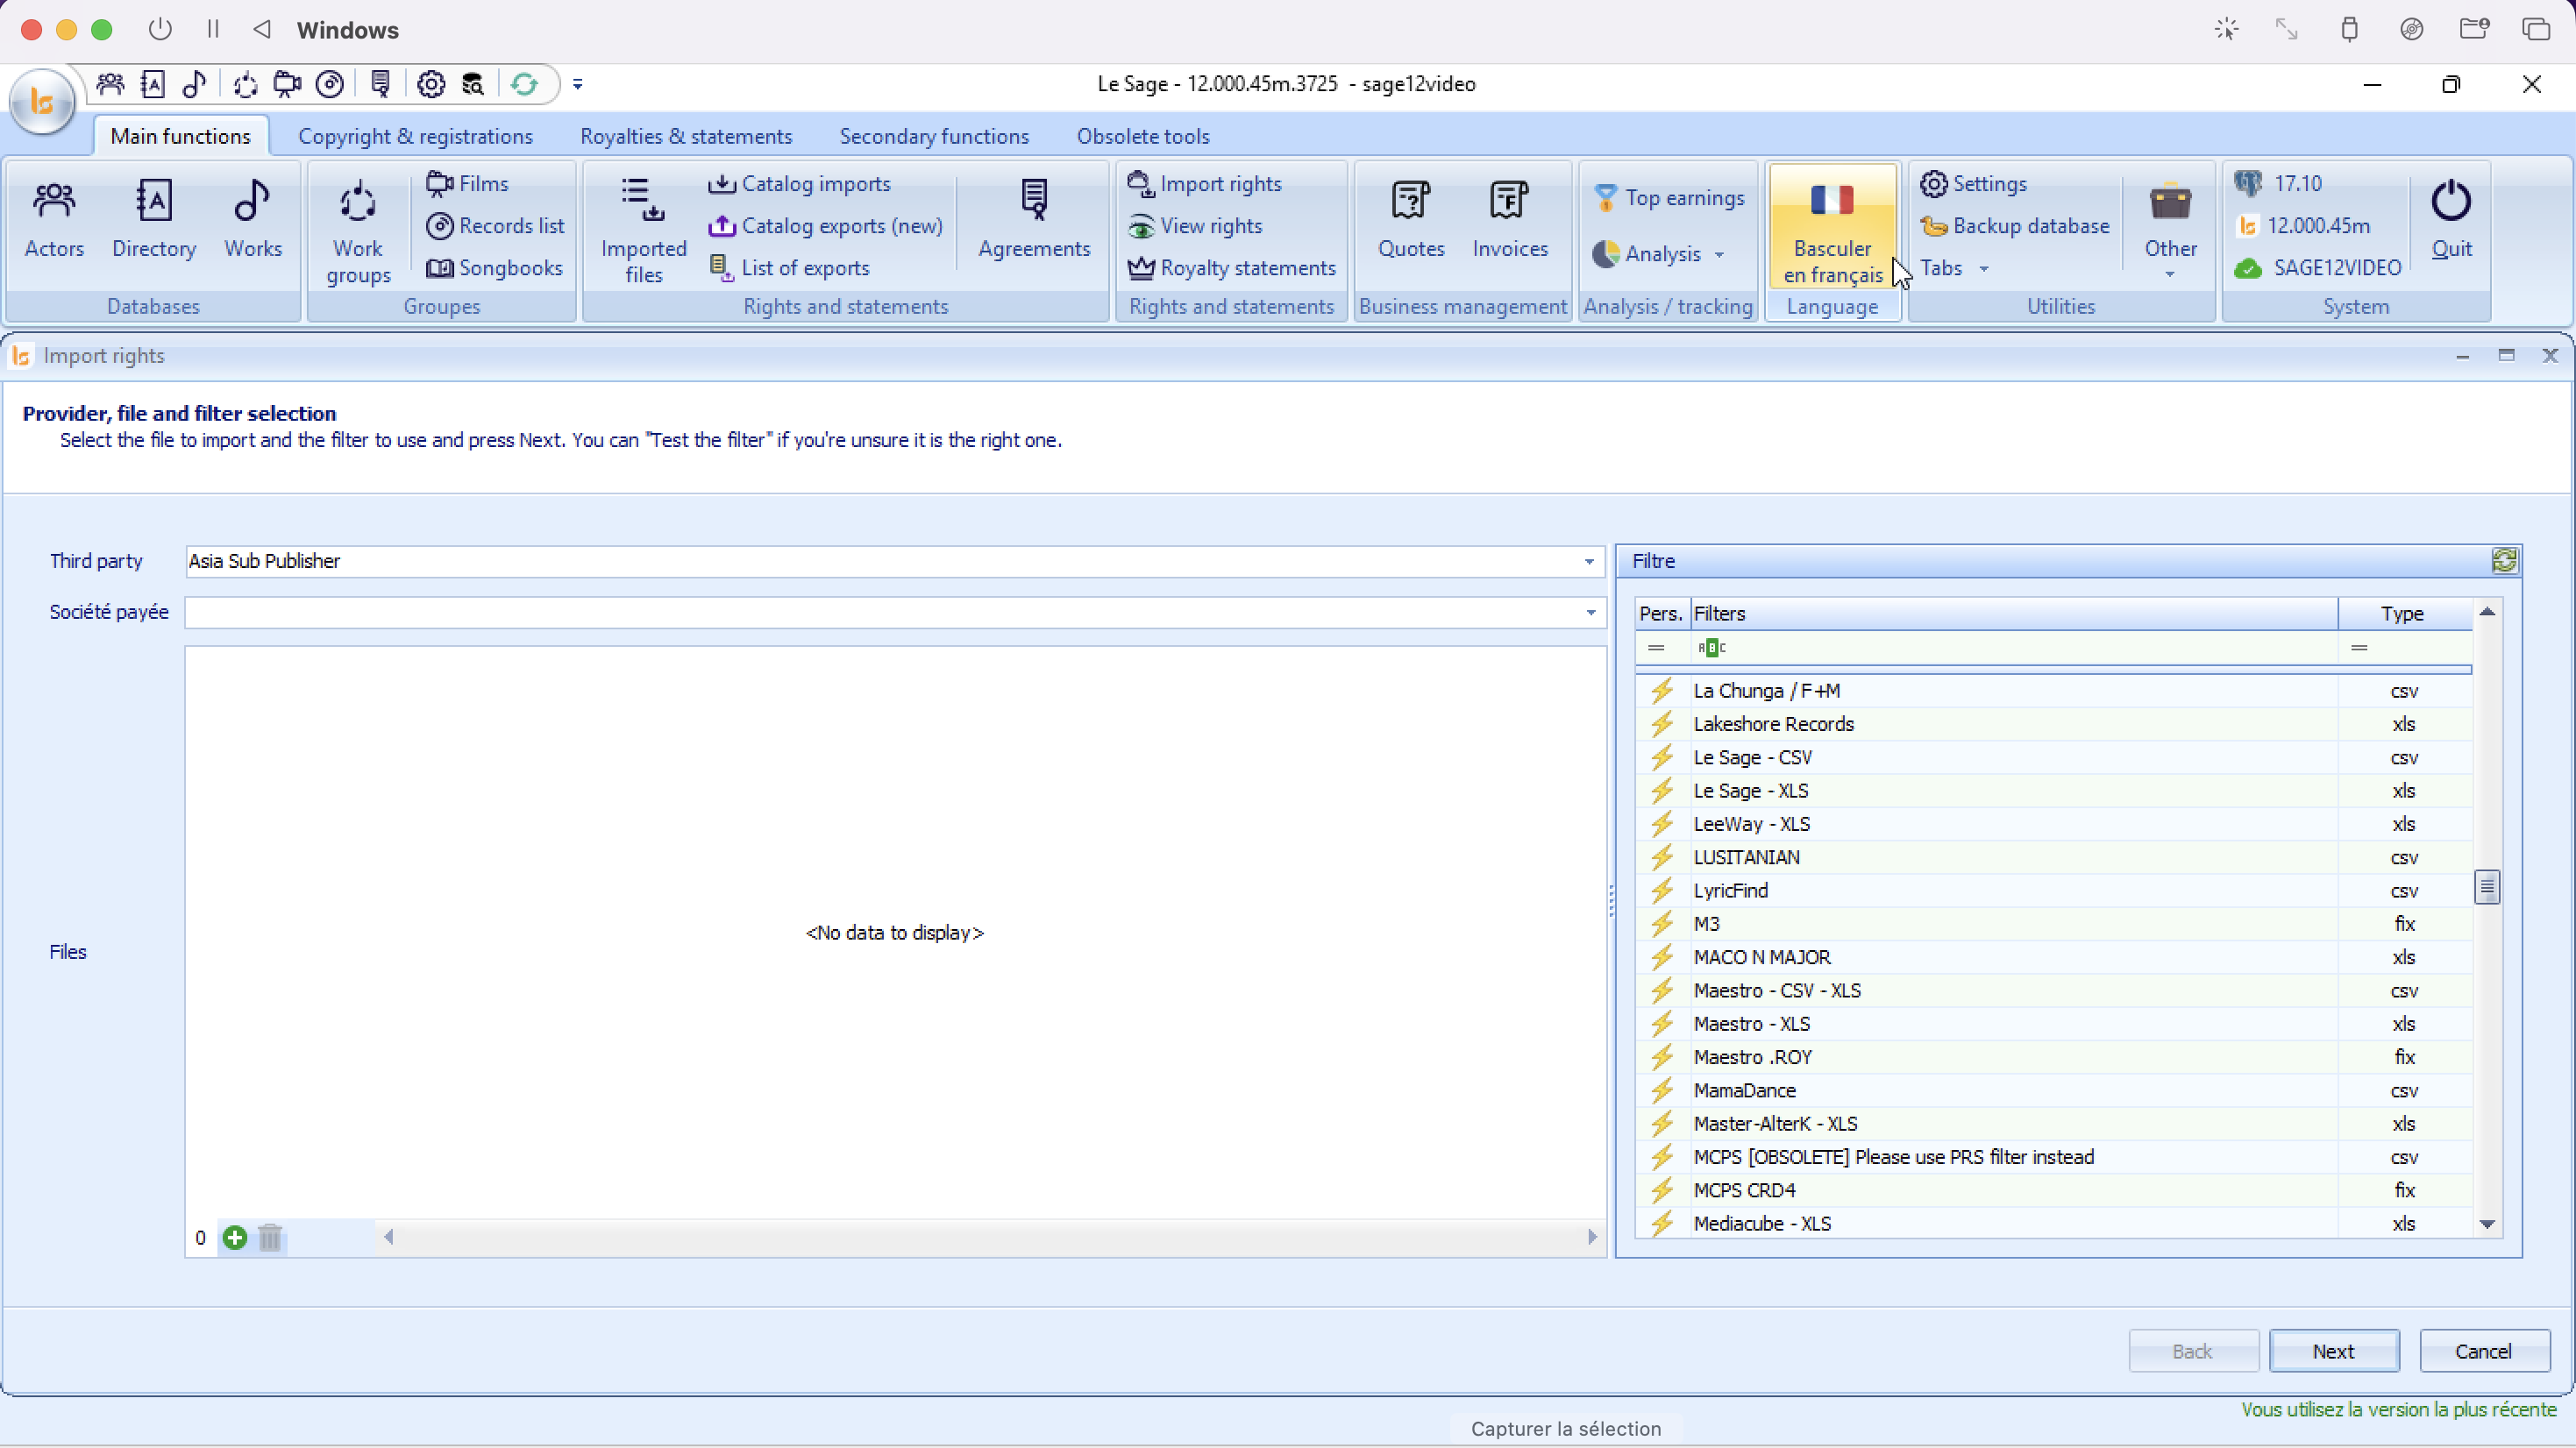
1. Interface Overview
The interface requires you to specify accountability links alongside your file and parsing filter selections:
-
Left Section (Accountability & Files): Dropdowns to assign who sent the money/data, and the file uploader tool.
-
Right Section (Filtre): The template list specifically calibrated for rights and financial data structures (e.g., LyricFind, MCPS, Maestro).
2. Step-by-Step Configuration
Step 1: Define Accountabilities (Third Party & Company paid)
Before choosing files, you must tell the system how to assign the incoming funds:
-
Third party: Click the dropdown and select the external client, publisher, or sub-publisher who provided the statement (e.g., Asia Sub Publisher).
-
Company paid : Select your internal company that received the payment described in the statement.
Step 2: Upload Royalty Files
-
Find the Files section below the dropdowns.
-
Click the + icon at the bottom left to browse your computer and upload your statement files (CSV, XLS, TXT, etc.).
-
Note: Multiple files from the same provider can be added at once if they share the identical file structure. Use the Trash bin icon to clear accidental selections.
Step 3: Map the Royalty Structure (Filter)
-
Scroll or search through the Filter column on the right side.
-
Select the filter matching the source organization or format layout (e.g., choose MCPS CRD4 if processing an MCPS statement).
When importing the file, you must know the sender in order to indicate it in Third Party, as well as choose the appropriate filter. The filter is named after the rights provider. A Third Party may have more than one file type. This is how we have four filters for SACEM, for example, as they can send several different formats. If you do not find a filter corresponding to your rights provider, please send us the file with the name of the provider.
3. Action Buttons & Navigation
| Button | Action |
| Back | Returns to the previous menu dashboard (disabled during initial step). |
| Next | Starts parsing the financial values and advances to the preview and calculation step. |
| Cancel | Wipes the current setup selections and closes the Import rights module. |
Options
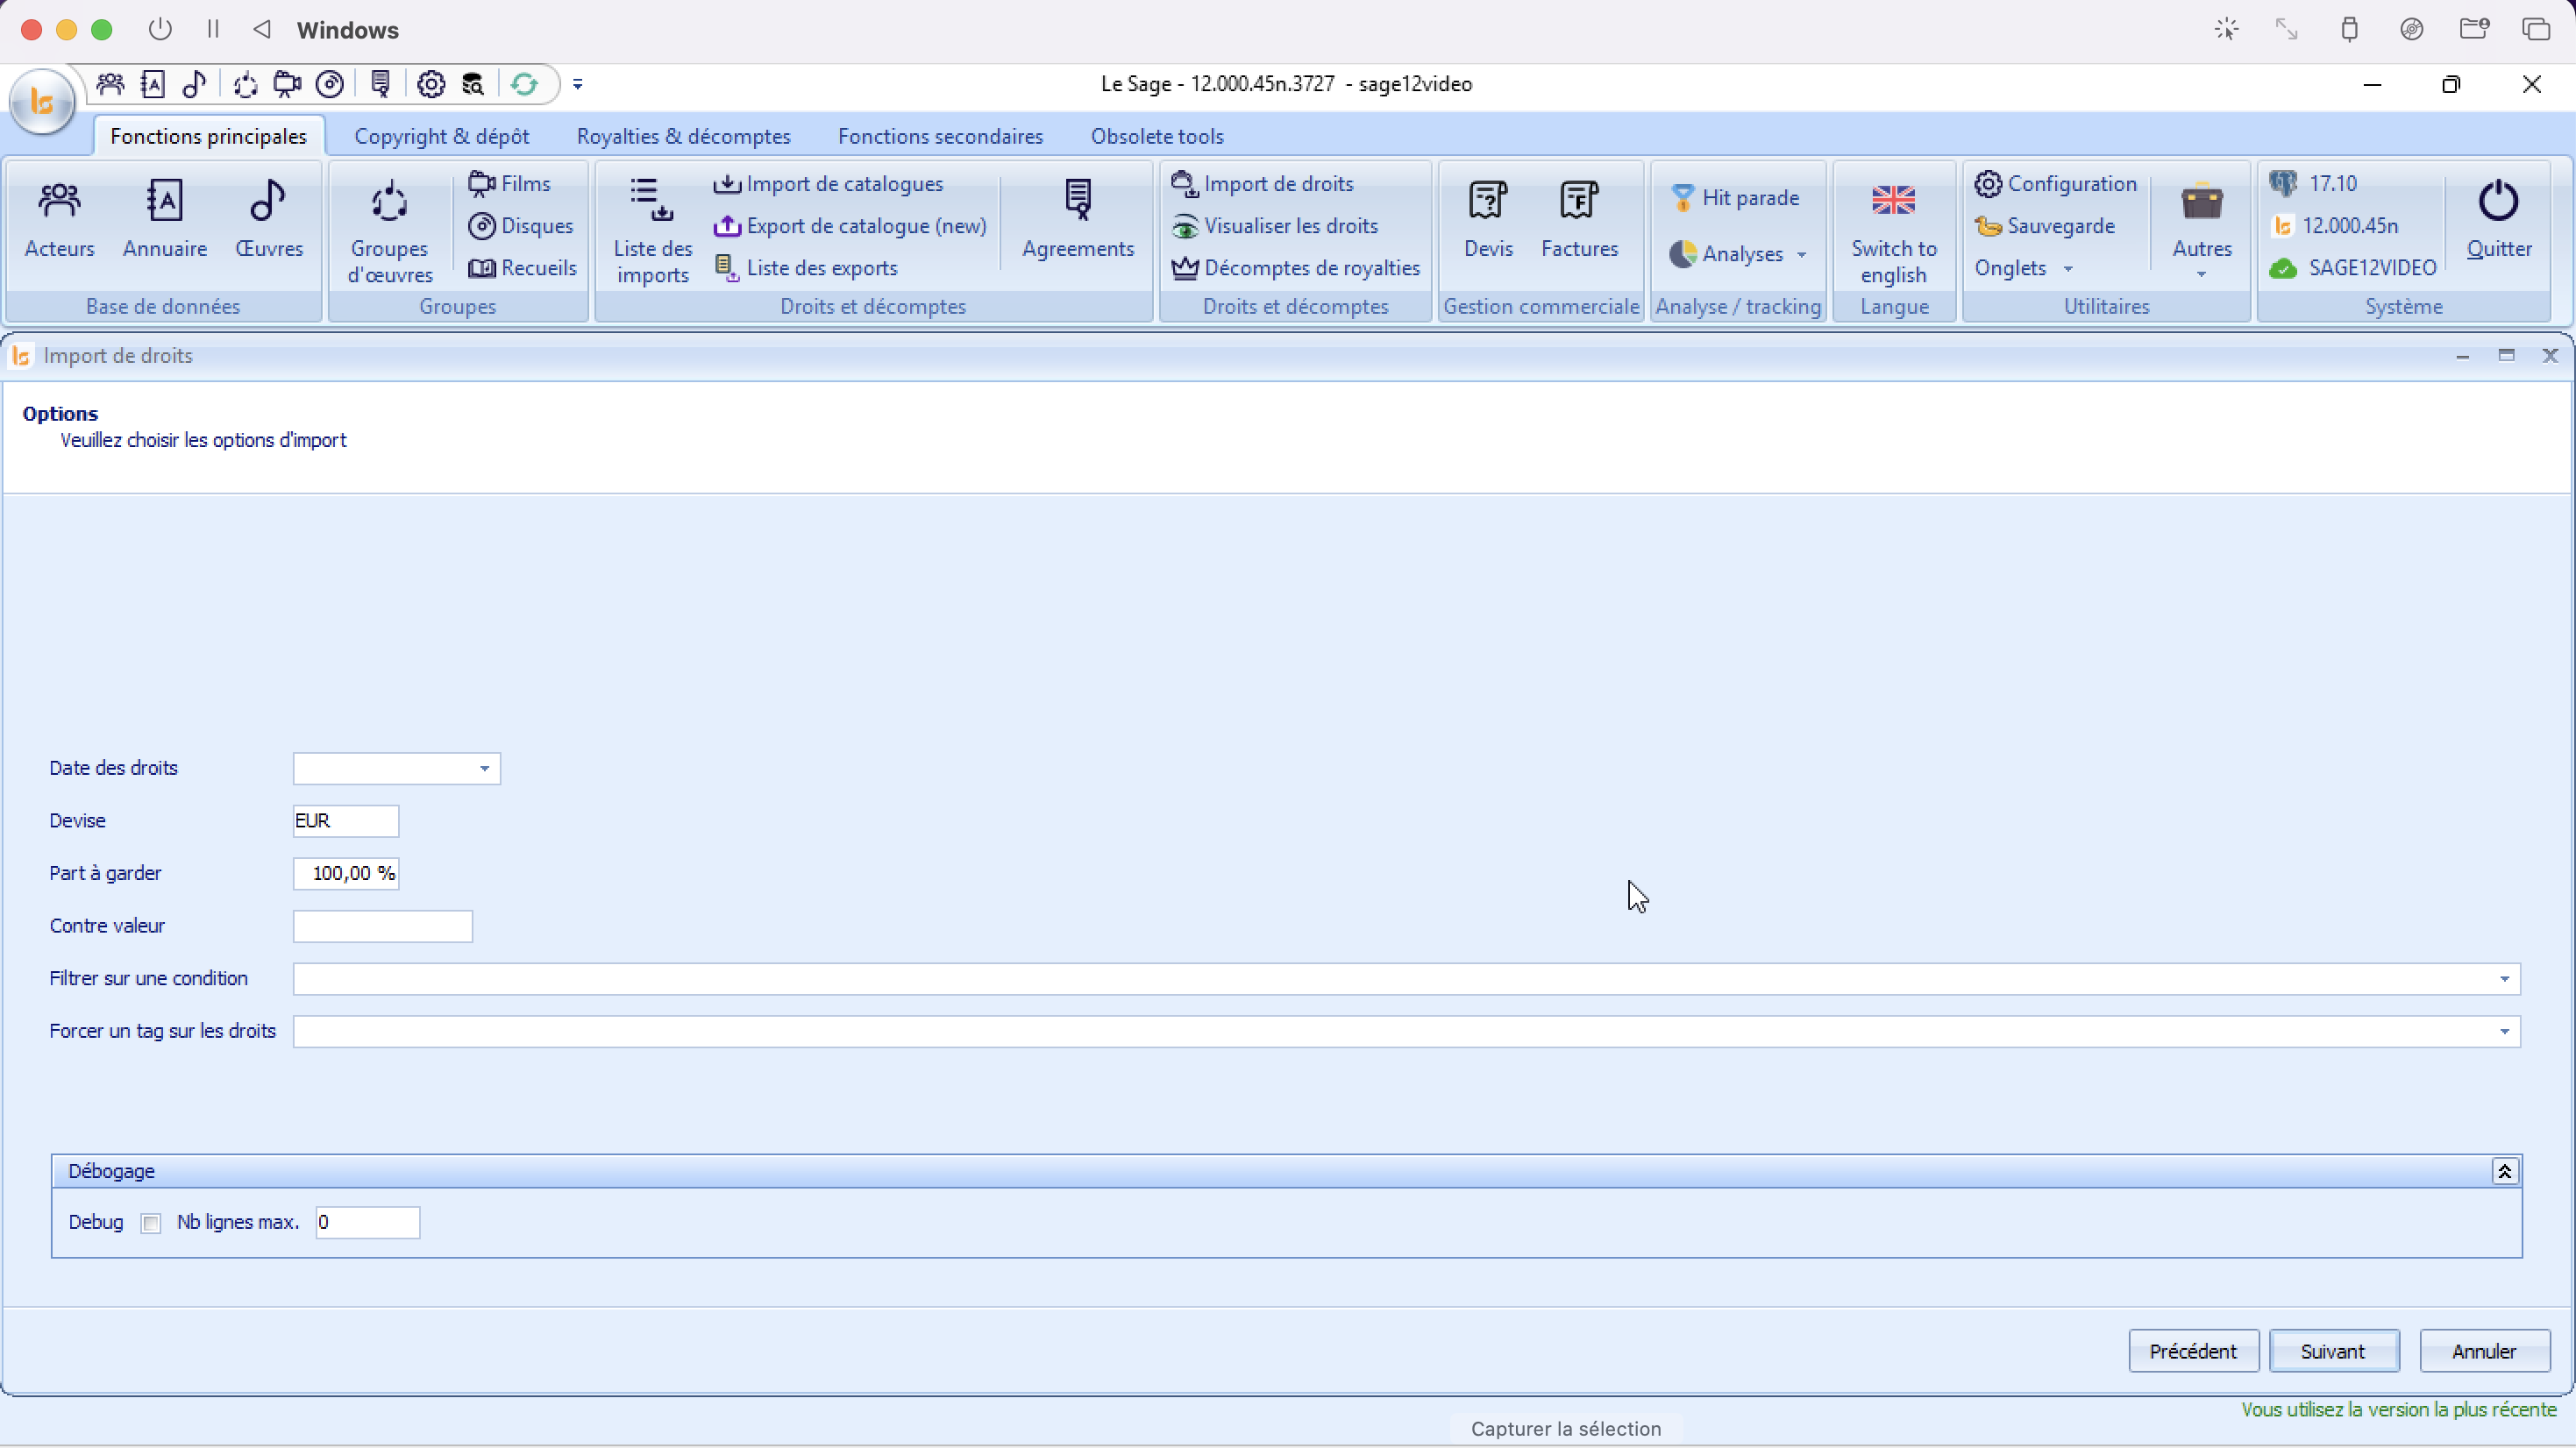
After selecting your statement file, third party, and parsing filter, clicking "Next" opens the Options page. This screen allows you to configure financial variables, apply currency conversions, and set up metadata rules for the incoming royalty entries.
1. Setting Up Financial and Administrative Options
Configure the parameters to align with your distribution rules:
-
Rights date: input the accounting/distribution period relevant to this statement (e.g., Q1 2026, H2 2025). This ensures royalties are allocated to the correct financial period.
-
Currency: Defines the base currency of the incoming document. By default, it is configured to currency defined as the default one in the Stettings. Modify this code if your statement uses a different source currency (e.g., USD, GBP).
-
Share to keep: Determines what percentage of the incoming money is retained by your company before sub-distribution. By default, it is set to 100,00% (meaning your company retains the entire gross amount, or commission calculations will follow default contract rules).
-
Counter value: If the statement currency differs from your system's main accounting currency, enter equivalent value in your currency accurately.
-
Filter on a condition: Use this dropdown to apply a specific logical rule to the import, parsing only the line items that meet a custom set criteria.
-
Force a rights tag: Allows you to automatically apply a specific tag to apply a special rule to the payout of the rights.
Debug: Located at the bottom of the window. Exclusively for us.
Statement Summary
Once the software finishes parsing your rights or royalty statement file, it advances to the Compte rendu screen. This stage provides a breakdown of the imported sheets, data volume, extracted financial sums, and parsing warnings before committing the records to your live ledger.
1. Interface & Grid Layout
The main table acts as a structured tree menu. Clicking the small Minus ($-$) or Plus ($+$) square icon on the far left expands or collapses individual sheets found inside your uploaded file.
Main File Attributes
-
File name: Displays the path of the processed spreadsheet (e.g.,
Z:\Downloads\GRANDS DROITS V2.xlsx). -
Nb lines: The total count of data rows successfully scanned (e.g.,
70lines). -
Amount / Amount in currency: The total aggregate financial royalty sum extracted from the document (e.g.,
184 214,37).
2. Reading Error Messages and Workbook Sheets
When expanding a multi-sheet spreadsheet workbook (e.g., Excel files with several tabs), Le Sage evaluates each tab independently:
-
Successful Tabs (e.g., Feuil1): * Displays the subtotal financial Amount parsed specifically from that single sheet.
-
The Active zones column indicates which named script or data layout template successfully mapped the rows.
-
-
Tabs with Errors/Warnings (e.g., Feuil2):
-
Message / Last error: Displays parsing flags such as
Headers not found. -
What this means: This alert indicates that a specific sheet inside your Excel file (like Feuil2) does not contain the expected data columns or is an empty layout tab. If the financial totals on the successful sheets match your physical statement statement balance, this warning can safely be ignored.
-
3. Investigating Logs & Interactive Details
💡 Pro-Tip: As noted in the subtitle instruction, you can double-click directly on any row or sheet line item to trigger a drill-down window displaying a detailed row-by-row view of the data.
Matching rights
The import of the rights at this stage is not complete. You cannot analyze them, output your statements, or simply view them as they are. It is necessary to establish the correspondences between the imported rights and lLe Sage database. To do so, you have to go to the list of imports.
1/ The import we just made is red. It indicates that the rights collected are not usable by the system for the moment. The system does not know yet how to read the information from the file.
2/ The status indicated summarizes the matching lines that are to be made for this file in order to be able to payout, analyze and extract the rights collected.
In the example: 2/2/2/2 should be read as follows: 2 types of rights / 2 families of rights / 2 lines of rights concerning territories / 2lines of rights concerning works without correspondence. In order to get a precise information on how many works and territories have to matches you can click on "Detailed status".
To start the matching, double click on the import line.
The matches are always made as follows:
- The 1st column being the information from the file
- the 2nd: the application of the new correspondence column. It materializes the effectiveness of the correspondence once you press apply.
- New match : choice in Le Sage of the how the system has to read the file information.
- The act of applying transforms the choice of a new match into a match found, remembering it for the newt file coming from that third party.
The tabs "types of rights", "Matched works" and "Songbooks" must be matched in order to use the information from the file. The "families of rights" and "territories" tabs allow you to give a more precise information to your beneficiaries on their statement but are not mandatory.
The Matched Works Tab
In this example there is only one work in the distribution file.
Start by establishing the already known correspondences : Le Sage will analyze the codes linked to the works: if the codes in the file match with the codes in Le Sage, the rights will be automatically associated with the works.
If works did not find matches after the first analysis, you will :
- "Create all unknown works" if you know that they are only works not present in your database
- "Start the match » : If you think you have these works but the codes present in the system are different from the ones in the file you are importing (or maybe the file doesn't give any codes). This phase allows you to match, create new works or postpone the match until later while waiting for more information from your supplier on the title on which it is perceived.
The information in the first box-1- is the information contained in the file. Depending on the files you will have more or less details.
Box 2 is your database. It will be a question of identifying if the work which arrives via the file is to be compared or not to a work within your database.
If it is :
- a new work: Create the work
- a new work that you want to complete immediately with copyright: Create and modify the work. This can be done in a second step. It is not necessary to modify this new work at the time of matching.
- a work that you do not know and that you want to ask your provider before incorporating it into your system: Skip. The work will remain as unmatched, and the import line will remain red.
- the same work as the one selected in box 2. OK. This will match the incoming work with a work in your database, associating it with codes if the file had any, and the rights associated with it.
- Cancel: you can cancel the matching session if you want to resume later. The works created or already matched will be kept in memory, and you will finish matching later.
All works matched manually will be listed in the "Matched works" tab. If you made a mistake in a match, all you have to do is select the line with the wrong match and click "Delete" (trash can icon). It will be necessary to start again "Start works match" to match it with the good work or to create new one. All created works will be listed in "Created works". This will allow you to create a group to process them.
The songbook tab
The songbooks must be created within the Sage in "Songbooks" to then establish the matching.
Viewing rights
Once the rights have been integrated into the system, you will be able to view them in "View rights".
View rights is a menu that allows to read, analyze, and extract data of collected rights. The quantity of rights imported or entered manually in the system rarely makes it possible makes it possible to visualize all of them. It is therefore important to restrict the search by:
- import number: the number to be indicated is in the list of imports.
- group: group of works for which we want to analyze the rights
- Period: period listed in the settings of Le Sage
- Condition: conditions on rights listed in the settings of Le Sage
- SACEM.CodeFilm: information imported through SACEM distributions
- Title begins with:
- Code starts with:
- Third party: third party informed when importing rights
Viewing tools
List templates
It is interesting to establish different list templates depending on the rights analysis to be performed. A lot of columns are available, depending on the information available in the files you have imported. List templates are displayed and adjusted by right-clicking on the list of rights. Once the columns have been chosen, each can be filtered to keep only certain information: origins, types of rights, etc.
Sum of rights
The sum of the rights is displayed by right-clicking on the bar at the bottom of the list at the level of "amount paid pressing "Add".
It is also possible to set up subtotal bars to group the rights according to certain characteristics (Right click on the column headers). You will select the column on which you want subtotals and place it above on "Drag a column".
Export
An export of the rights wiewing in xlsx format is available by right-clicking on the column headings.
Associate a tag
Tagging rights allows you to isolate certain lines of rights to treat them differently from traditional payments.
Example: you have obtained a new catalog. A work is paid to you, whereas it should be paid to the previous sub-publisher given the start date of your contract. You can tag these rights lines to say that those with this tag must be, regardless of the type of rights paid, paid to the previous sub-publisher. We will see that for this same example, it will not necessarily be useful to tag the rights but to explain in the contract that before a certain date we do not pay for the rights received and the date we pay the actors.
Royalties
Pay out the rights received
One of the primary functions of Le Sage is to allow to pay out the rights collected. In order to give you maximum flexibility in the way you manage these payments, Le Sage offers two complementary operating levels: the “contract” mode and the “work” mode. In both modes, the definition of payouts is done in the same way: you define one or more beneficiaries and the splits (percentages) that will be paid to them according to different criteria.
In the "contract" mode, you create a contract and indicate the payout information (the "royalties"). You attach this contract to a group and all the works of this group will be subject to the payout provided for in the contract.
This mode is to be preferred because:
- it works just as well whether the group contains one or several thousand works,
- if you made a mistake in your payout splits, you simply correct the contract and all the works benefit instantly from the correction,
- if new works are created and you need to apply the same payout to them, just add them to the group; in some cases, this addition can even be automatic (dynamic groups)
In the "works" mode, the royalties (payouts) are defined directly in the work. The payout information defined in the work takes priority over that of the contracts. If you modify the percentages in a contract and your statements do not change, it is likely that the rates taken into account are those defined directly in the work. This operation makes it possible to define a general case and exceptions: if a work in a group must be subject to special payments, it is not necessary to remove it from the group (and this group can continue to be used for other treatments - such as analyzes).
Agreements
Payout agreements allow you to create payment rules, royalties, and apply them to a group of works.
They are created from "Agreements" in the "Main Menu".
From this screen, you can:
- add
- delete
- update changes
- duplicate an existing contract.
The agreement form
- Description : agreement name
- Subtitle : specification to help differentiate two agreements
- Type of agreement: For royalties, this is "Payout"
- Territory: territory to which the contract applies
- Signature date: date on which the contract was concluded (only if you want to keep the info here - it isn't useful in the software)
- Expiration date: contract end date (only if you want to keep the info here - it isn't useful in the software)
- Floor: when several contracts are attached to a work (because it is part of several groups), the floors allow you to know in what order these contracts apply. The Sage will apply the top floor.
- Company: Company to which the contract is attached (will condition the header of the statement)
- Manager entitled:?
- Notes: personal notes regarding the contract. Purely internal use.
- Royalties
To have access to the royalties box, you must fill in a description and a type of agreement and press Create (2)
You can then enter how you want the contract to work.
Style
Styles make it easier to read royalties when they are complex. Different repayments for the same types of rights under certain conditions can be easily red through the colors and styles of text. Styles are set in Le Sage Settings (Styles).
Actors
Royalty basis
The royalty base (by default at 100%) makes it possible to adjust the amount received. For example, if you collect the share of two co-publishers and you need to pay 90% of the rights to each, you should indicate a payout of 45% to each (50% of 90%). Your customers may not understand the reason for this fancy rate. By indicating a royalty base of 50% and a repayment of 90%, the amount collected will be divided by 2 and the accounts will show 90%. The amounts will be the same, of course.
Conditions on rights
Selection of a condition on rights, among those created in the Settings of Le Sage.
Distribution key
The payout key uses a column in the copyrights to pay out the royalties. The key is associated with the special actors described in Special Actors. The "Special sharing" column makes it possible not to use the statutory distributions.
Controlled by
This field allows you to force the headers and footers of a different company from the one listed in the work or in the contract. This is often useful for catalogs in management. The called field is a company. The companies are to be added in Settings of Le Sage (Companies).
Payments by type of rights
Use of contracts
A royalty contract applies to a group of works. Once the contract has been entered in the list of contracts:
- Create a group of works (or use one already created)
- In the group file, "General": Choose the name of the created contract from the drop-down menu of the "Contract".
- Check within a work of the group that the royalties are now well displayed. * Be careful if you have defined royalties within a work, the contract will not apply even if the work is within the group to which the contract applies.
The statements
The "Royalty Statements" screen allows you to calculate and print the royalties statements. Before going to the"Royalty Statements" tab, you will need to go back to "Settings" to define one or more periods that you want to calculate.
You can create as many periods as you want. Once your periods have been created, you can go to the "Royalties statements" menu.
Choose the period and press "Calculate". You will be redirected to the estimate tab which shows you the actors for whom there are payments over the period.
The columns
- N °: internal Le Sage number of the actor
- Name: actor name
- Group: indicates if this is a group of actors
- Last closing:
- Date of last closing
- Gross balance: if the last period was closed in gross, this sum will be carried over to this account.
- Net balance: if the last period was closed net, a payment must have been entered to settle the amount due
- Payments: payment that settles the Net balance of the previous period
- Gross
- Weighted collected: total amount collected for the works of this actor (weighted by the royalty base in the royalties)
- Rights of period : amount due for this period
- Exceptional credits: sum of gross exceptional credits for the period. This can be amounts that you wish to pay him such as an advance for which you wish to recoup contributions to him.
- Net
- Amount due: amount you owe him after deduction of advances and other deductions (withholding tax, social security contributions, etc.)
- Advances: amount indicated net in exceptional credits
- Deductions: amount of charges/taxes
- Currency: currency in which the statement is calculated
- Check mark: selection of the statement lines
- Banknote: Checking this box indicates the intention to pay the actor. This action is automatic when the amount to be paid is greater than the payment threshold. The net amount is calculated as soon as this box is checked. If it is not, the gross amount will be carry out to the next statement when you will proceed to closure.
- Amount paid: the amount is displayed once the banknote column is checked. The amount takes into account social contributions or specific taxes.
- Folder / Magnifier: Opens the actor's statement in PDF so you can check it.
The actions
- Print the estimate: prints the estimate page(s) : One excel sheet with the detail for all of your actors.
- Export estimate: exports the estimate in Excel format. One excel sheet with the detail for all of your actors.
- Pay: after having selected the statements to be paid, the button allows you to enter an effective date of payment of the statements. The payment are taken into account in the next statement.
- Export: exports the selected accounts according to the "export options" formats selected.
- Closure: closes the selected statements. The closing moves the balances forward. Allows the amounts to be carried over to the next statement.
- Export and close: exports and closes the selected accounts.
Closing and payment
The closing of the accounts moves the balances. This allows gross balances to be carried out to the next statement and transform into a net balance if necessary.
Two options: select the account (s) to close it (them) or to close it (them) by exporting it. If you do not close a statement, on the next statement, the unpaid gross balance will not carry out and you will lose visibility of the status of pending payments for the actor.
The payment will be automatically checked if the sum exceeds the payment threshold you have indicated for the company. The latter can also be forced. This checkbox shows the net balance payable on the statement that you send to your actors.
To enter the actual payment for the amount due, click on Pay:
- note the date of the actual payment (optional)
- the date in the period: this is the first date of the next statement period, so that this payment can be taken into account when calculating the statement for the next period. You will find this information in balances and payments in the actor file: Balances and Payments tabs.
To resume :
- if you have payed your actor you close the period in Net and you add the payment
- if you haven't payed your actor you close the period in Gross so that the amount is carried out in gross to the next period.
Verification
The verification's tab reports all works for which there are payment errors. This will enable you to analyse the rights paid and going back to the work to check the rules that apply.
We have a work for which we have received money (1253 €) but for which the payment rule defined does not add up to 100% (Min rate 55% and Max rate at 55%). To understand why this work is not paid out correctly, you can start by clicking on see the detail
We see that we have received rights, whose entitlement type is ETDEP for an amount of € 1,253 and for which there is 55% payed out. It is therefore a question of closing this verification and double clicking on the problematic work. By opening it we see that there is a contract attached to the work. But if we look closely, there is only 5% instead of 50% in the foreign performing splits.
To modify the contract you can double click on the name of the contract attached, modify the split and save.
The work will disappear from the verification tab after recalculating the statements.